
How to get access and add it to TradingView
Purchase Access
Head to the Indicator Page and pick the plan that works for you. There are Monthly, Quarterly, and Yearly plans. Every plan includes the Fractal Model indicator as well as a exclusive discord role within TTrades Community.
Once you’ve purchased, go to Whop.
Whop
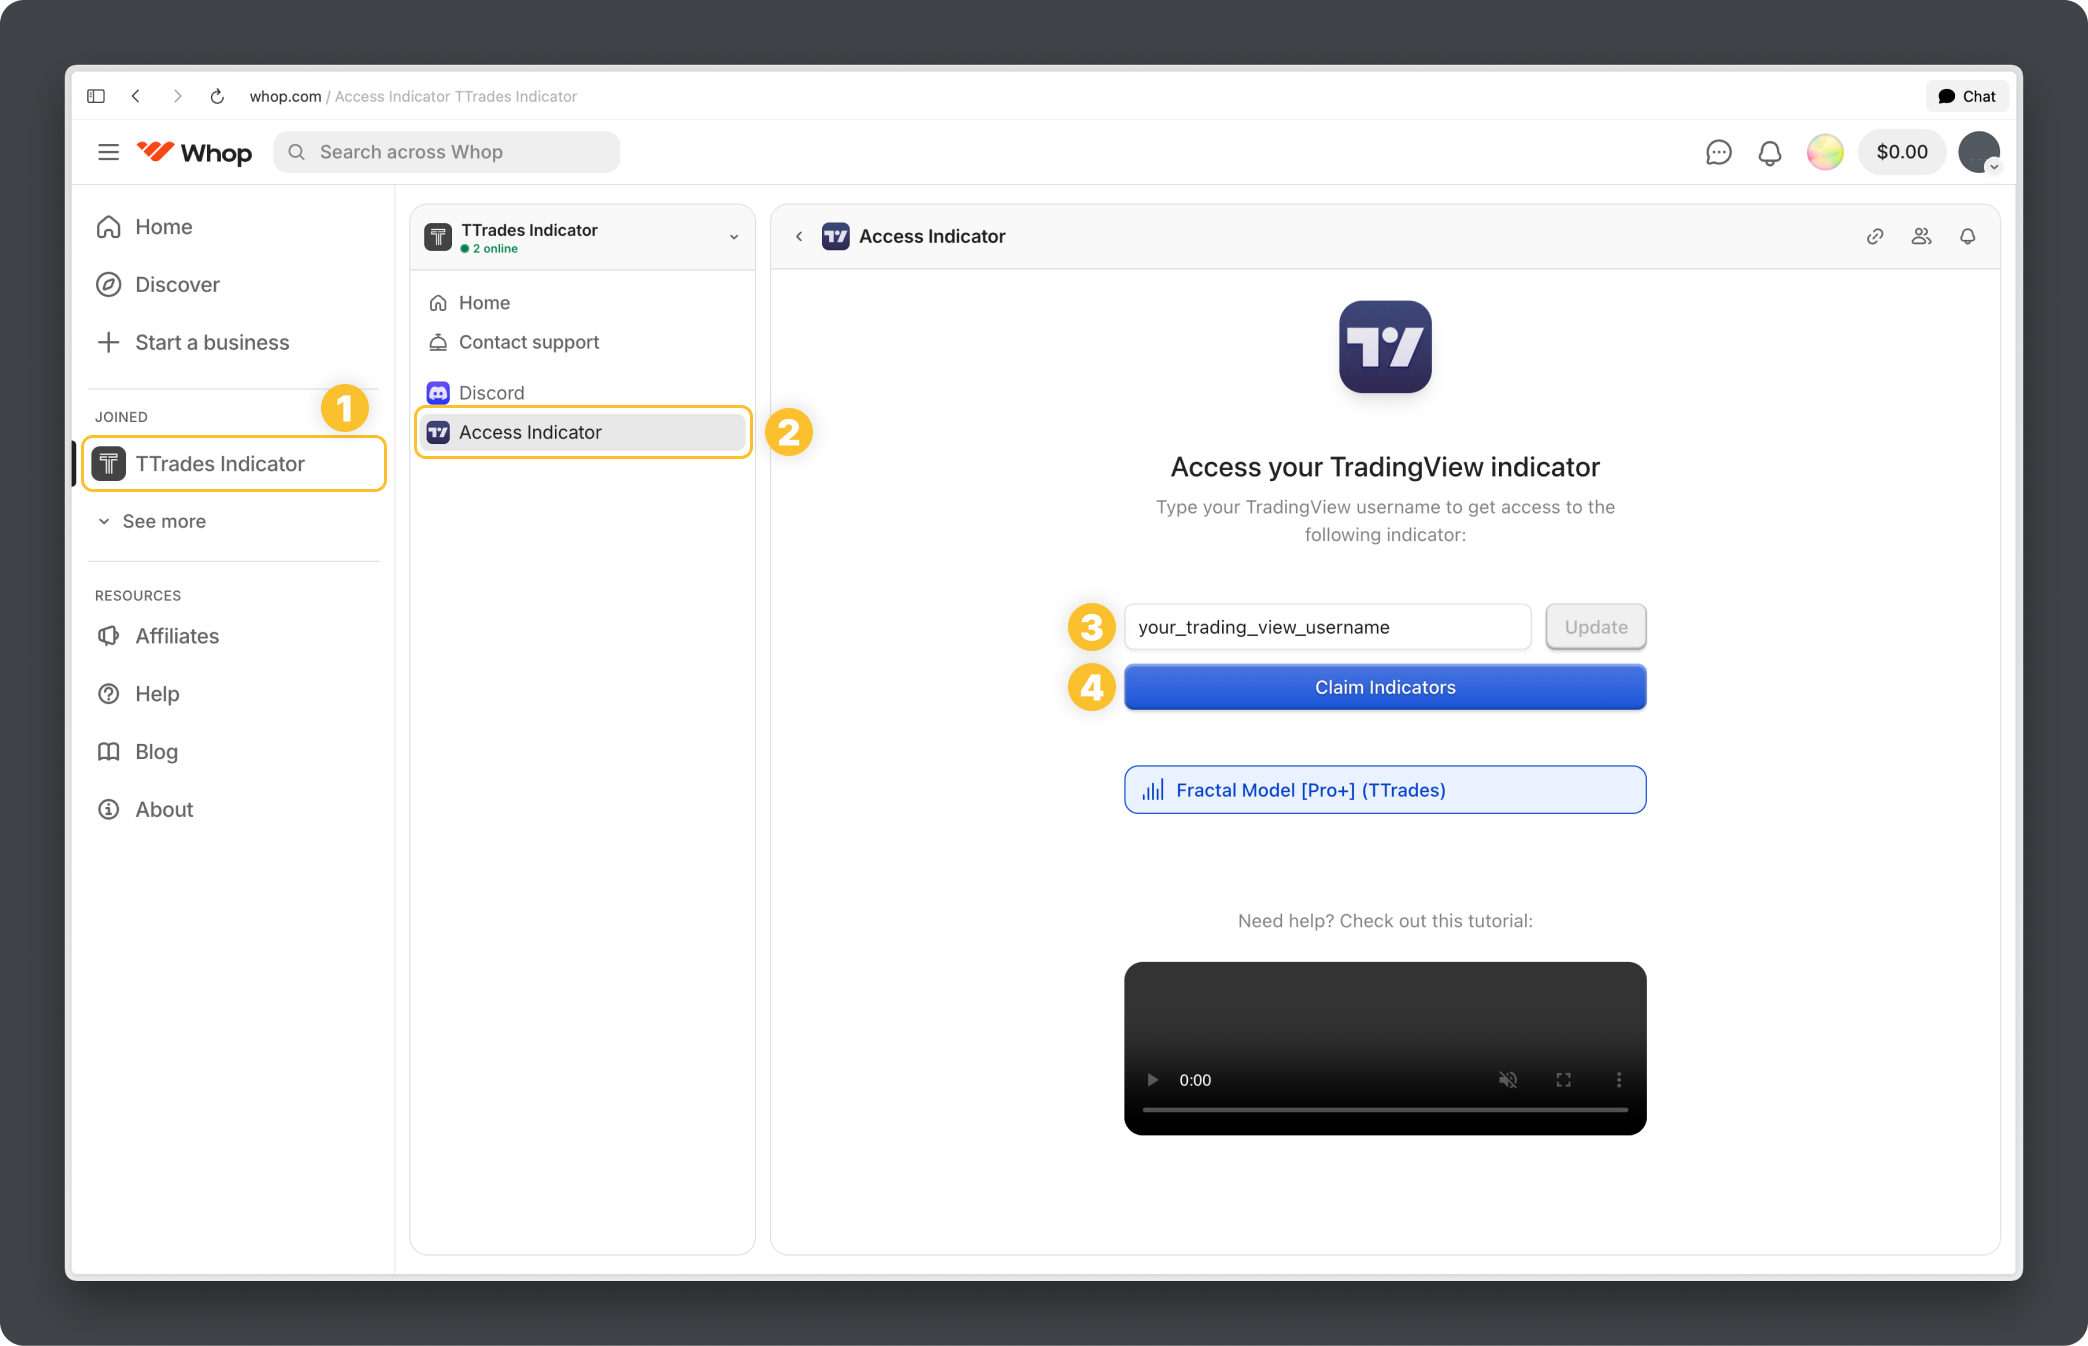
- Select the TTrades Indicator Whop
- Click the TradingView icon inside the TTrades Whop on the lefthand side
- Enter your TradingView username to link to your account, make sure the username is correct
- Once done you’ll see “Fractal Model [Pro+] (TTrades)” appear in your invite only scripts.
TradingView
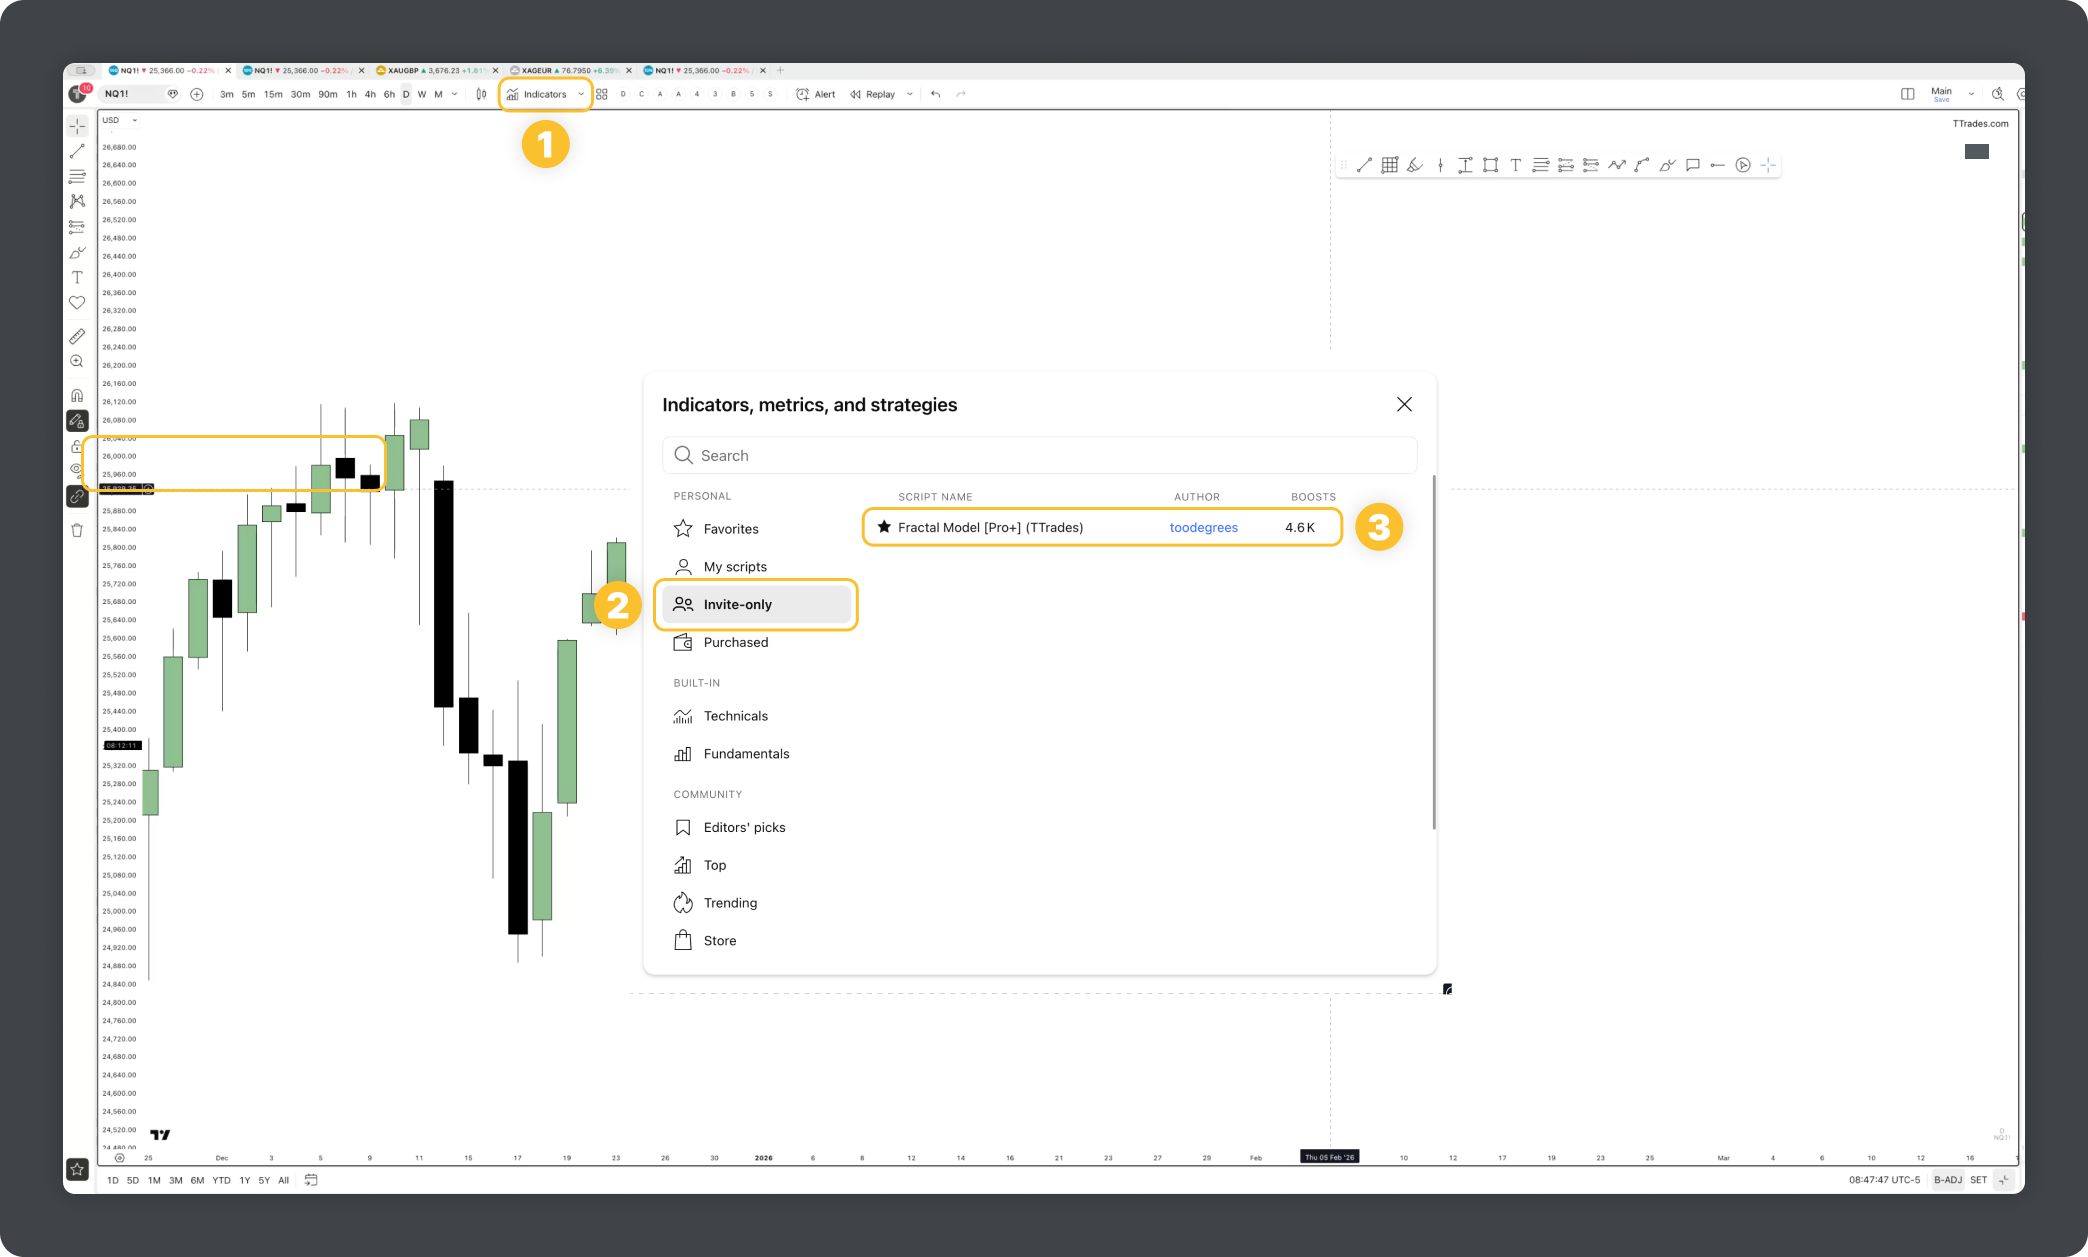
- To add Fractal Model [Pro+] (TTrades) Indicator to your chart, open the Indicators panel on TradingView, go to the Personal tab, click “Invite-only,” and it’ll be sitting there. Click it and it loads straight onto your chart.
- If you want the Fractal Model [Pro+] (TTrades) Indicator to appear in your favorites, make sure to give it a start for faster access.
How to claim Discord role
The indicator also comes with a custom role within the TTrades Community Discord. This role grants you access to exclusive channels only available for indicator users, so make sure even if you are already in the discord you follow these steps.
Whop
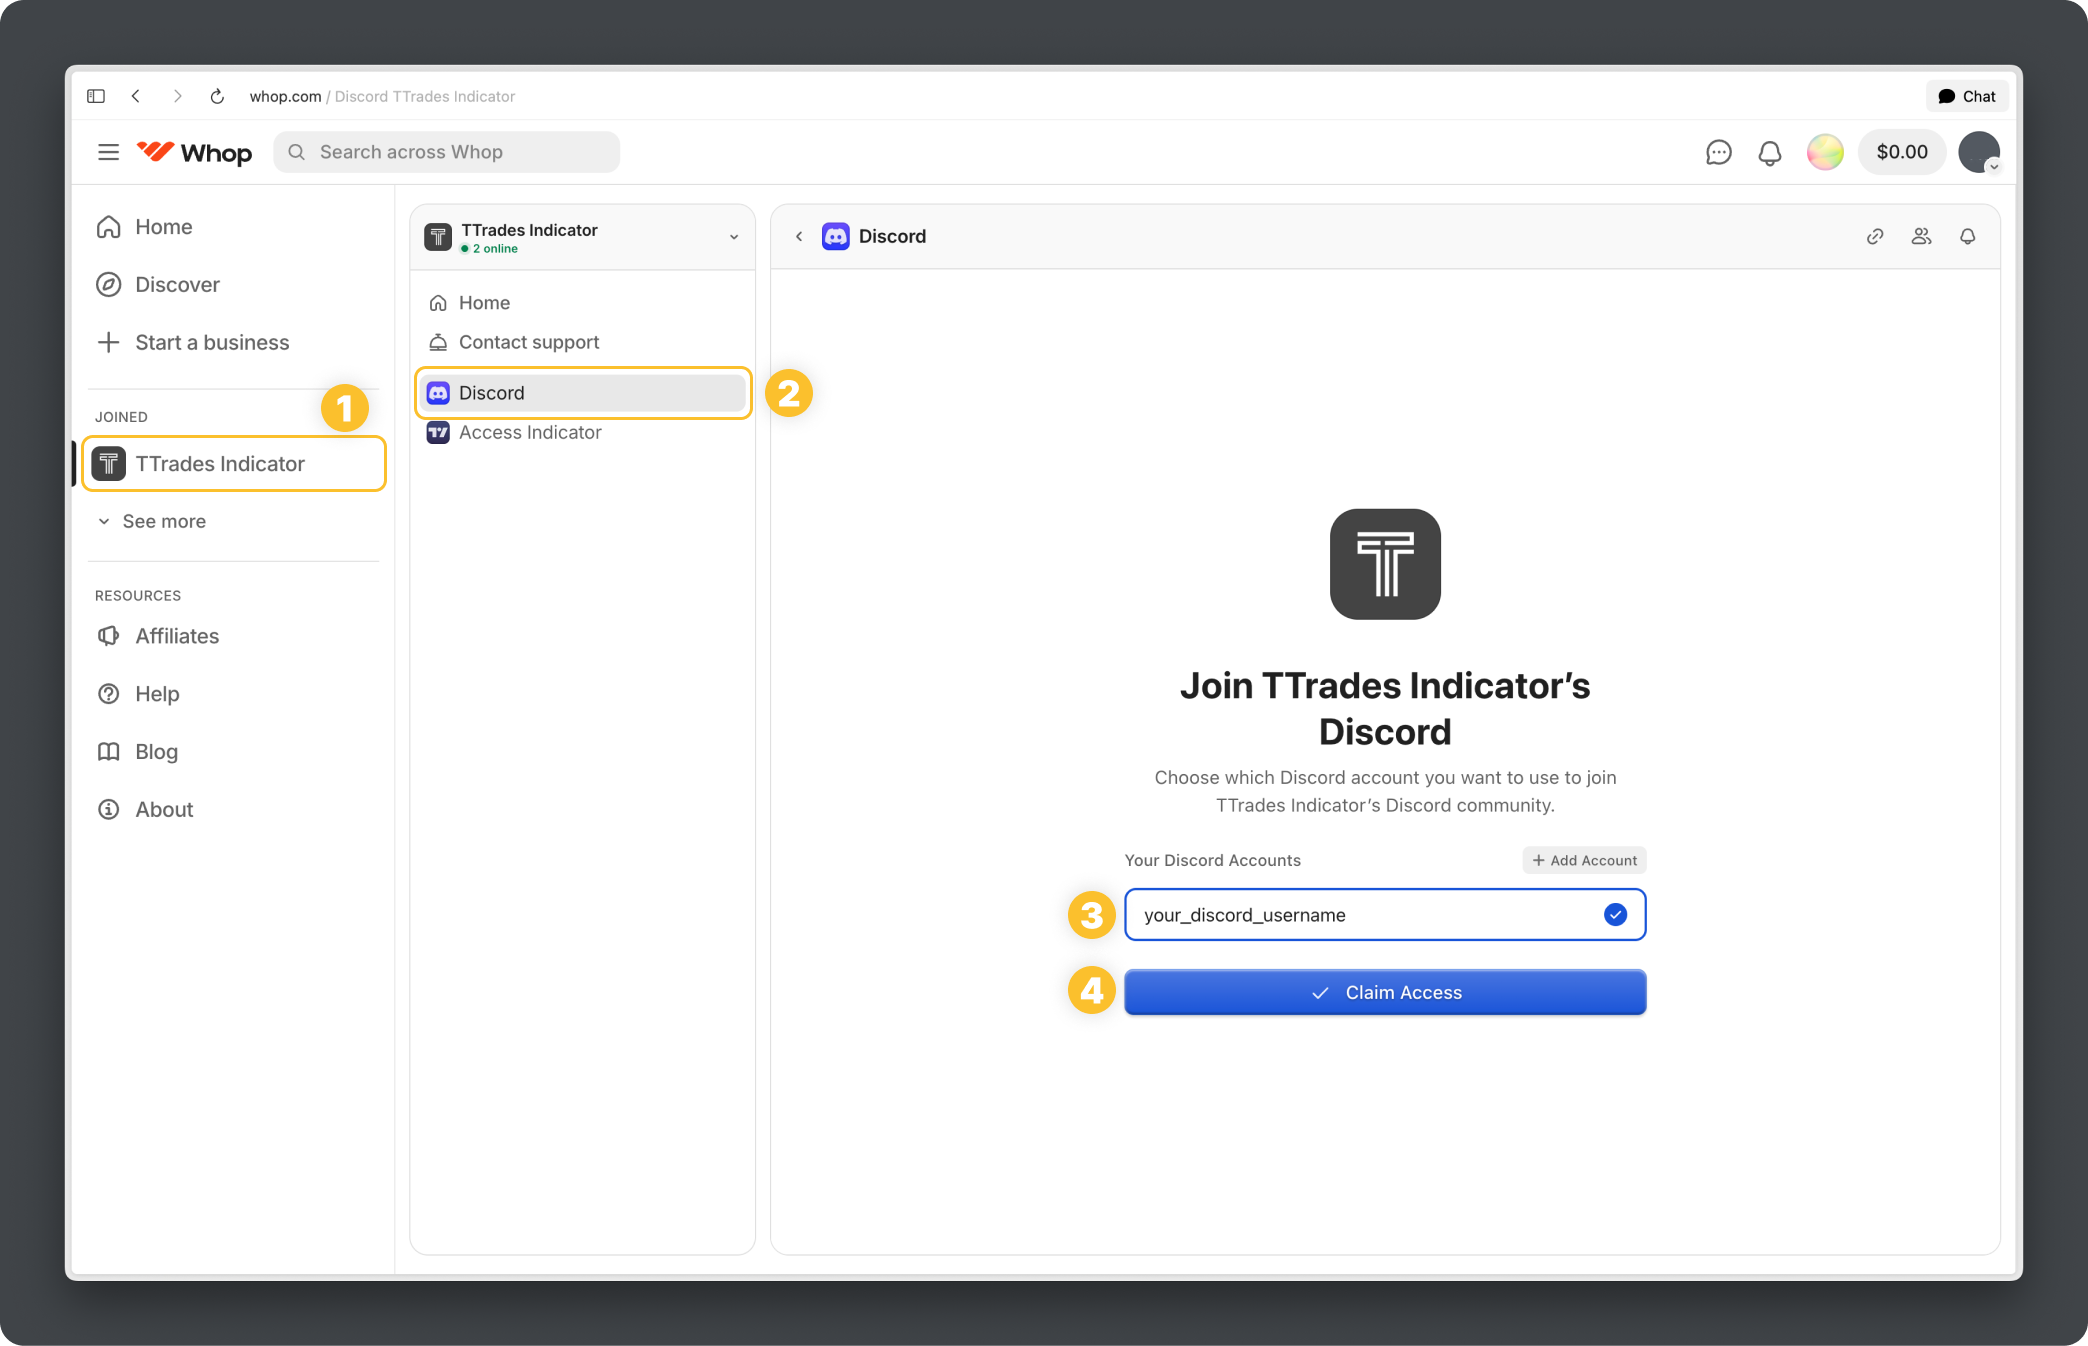
- Select the TTrades Indicator Whop
- Select the Discord icon inside the TTrades Indicator Whop on the lefthand side
- Input your Discord username
- Claim access
- You will now be inside TTrades Community with a custom “TTFM Indicator” role!
A reminder that not TTrades nor anyone from TTrades Team will friend request or DM you. Turn off friend requests as well as DMs and do not respond to any DMs. Communication will only be done within the discord.
Where to reach out for Support
Discord
The fastest way to get help is through the TTrades Discord Community. If you’re running into any issues, chances are it falls into one of these categories:
- Account access or login problems
- Billing or purchase-related questions
- Installation or setup issues
- Indicator not displaying or functioning correctly
- TradingView-related problems
- Settings and customization questions
- General troubleshooting or unexpected behavior
Luckily, getting help with any of these issues is simple.
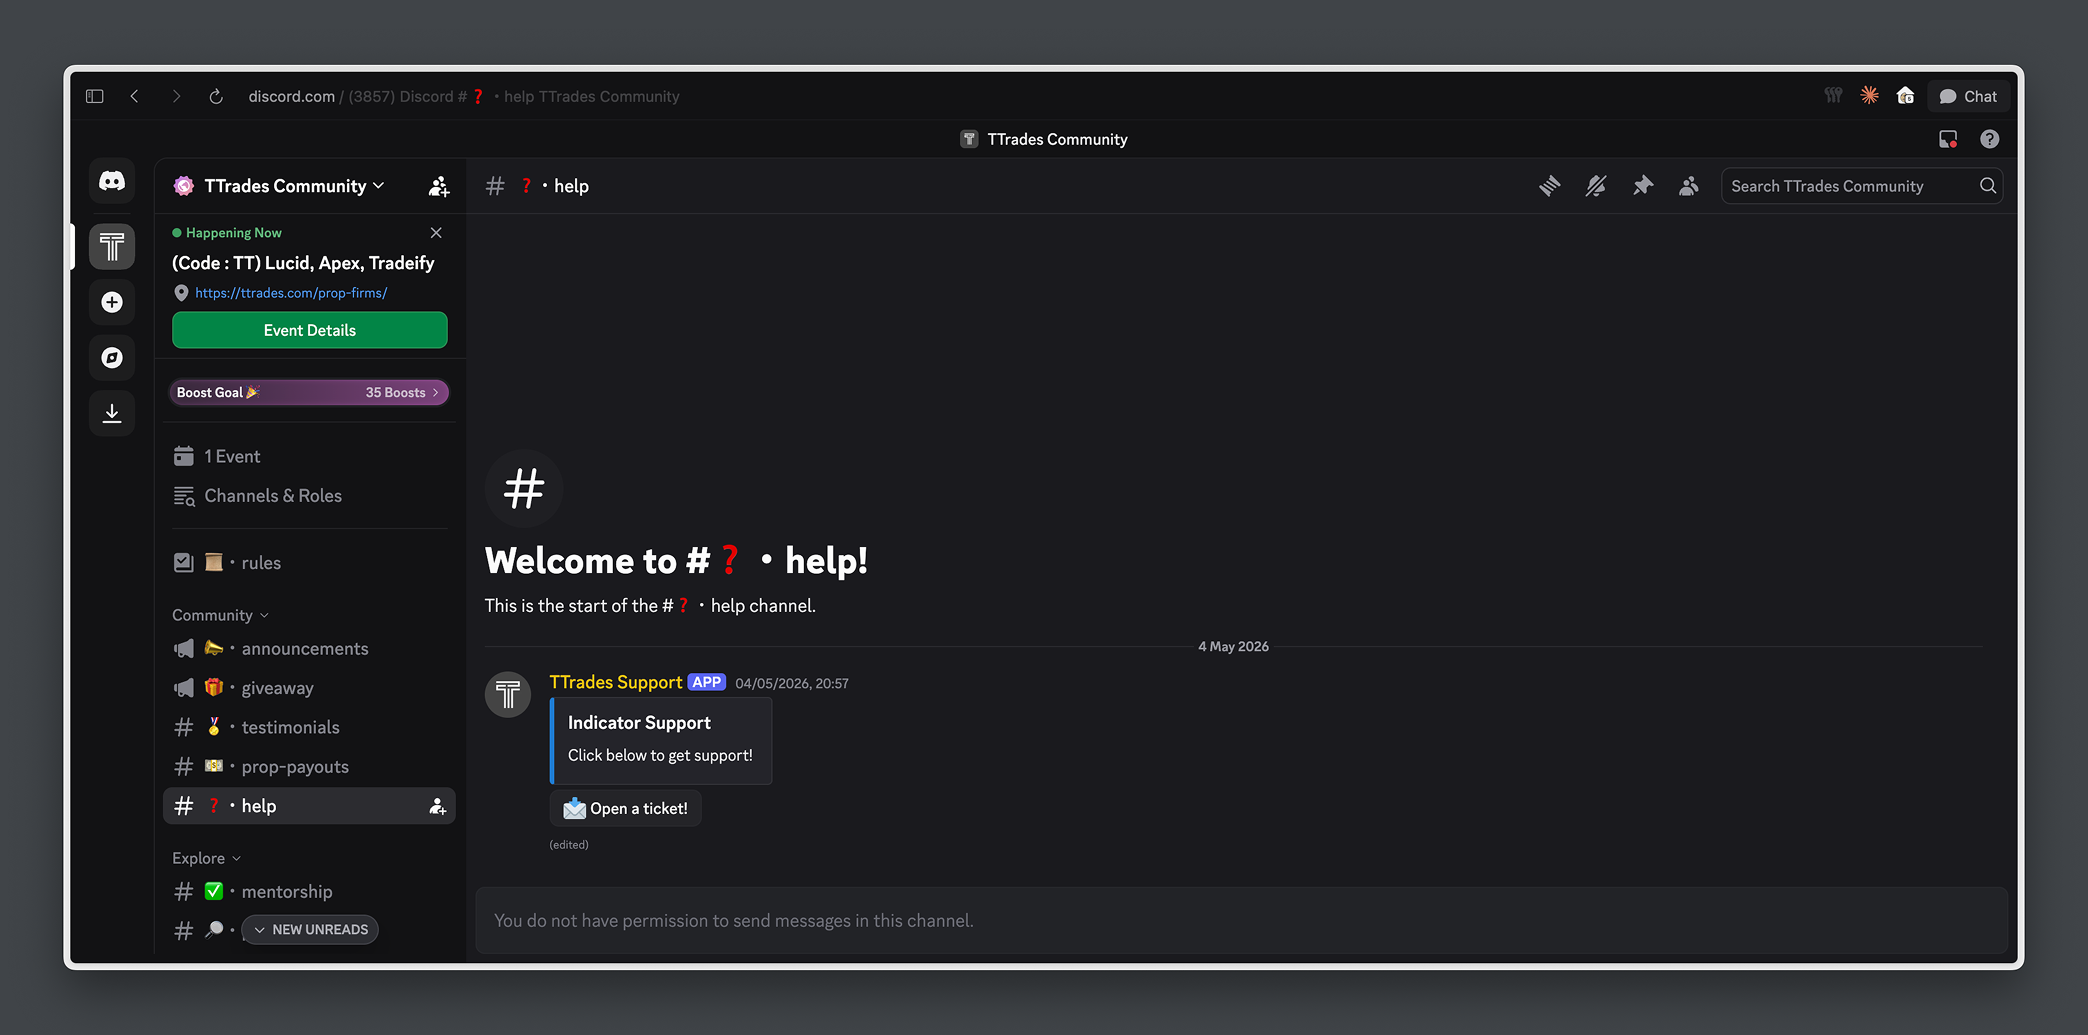
- Inside the TTrades Discord, head to the ❓ help channel under the Community section and open a support ticket.
- When submitting a ticket, include your Whop username and a clear description of the issue you’re experiencing. This helps the support team resolve it as quickly as possible.
- Once your ticket is open, a team member will respond with a resolution, so keep an eye out for updates.
Before opening a ticket, it’s worth checking the rest of this guide first. Most common questions are already answered here.
How to use the indicator
At first glance, the settings panel may seem extensive, but each option is intentionally designed to control a specific part of the Indicator’s behavior. Once you understand what each setting does and how it impacts the output, the entire panel becomes intuitive and easy to navigate. The settings give you the flexibility to fine-tune the tool to match your exact trading style and preferences. Below is a complete breakdown of every setting and how it functions.
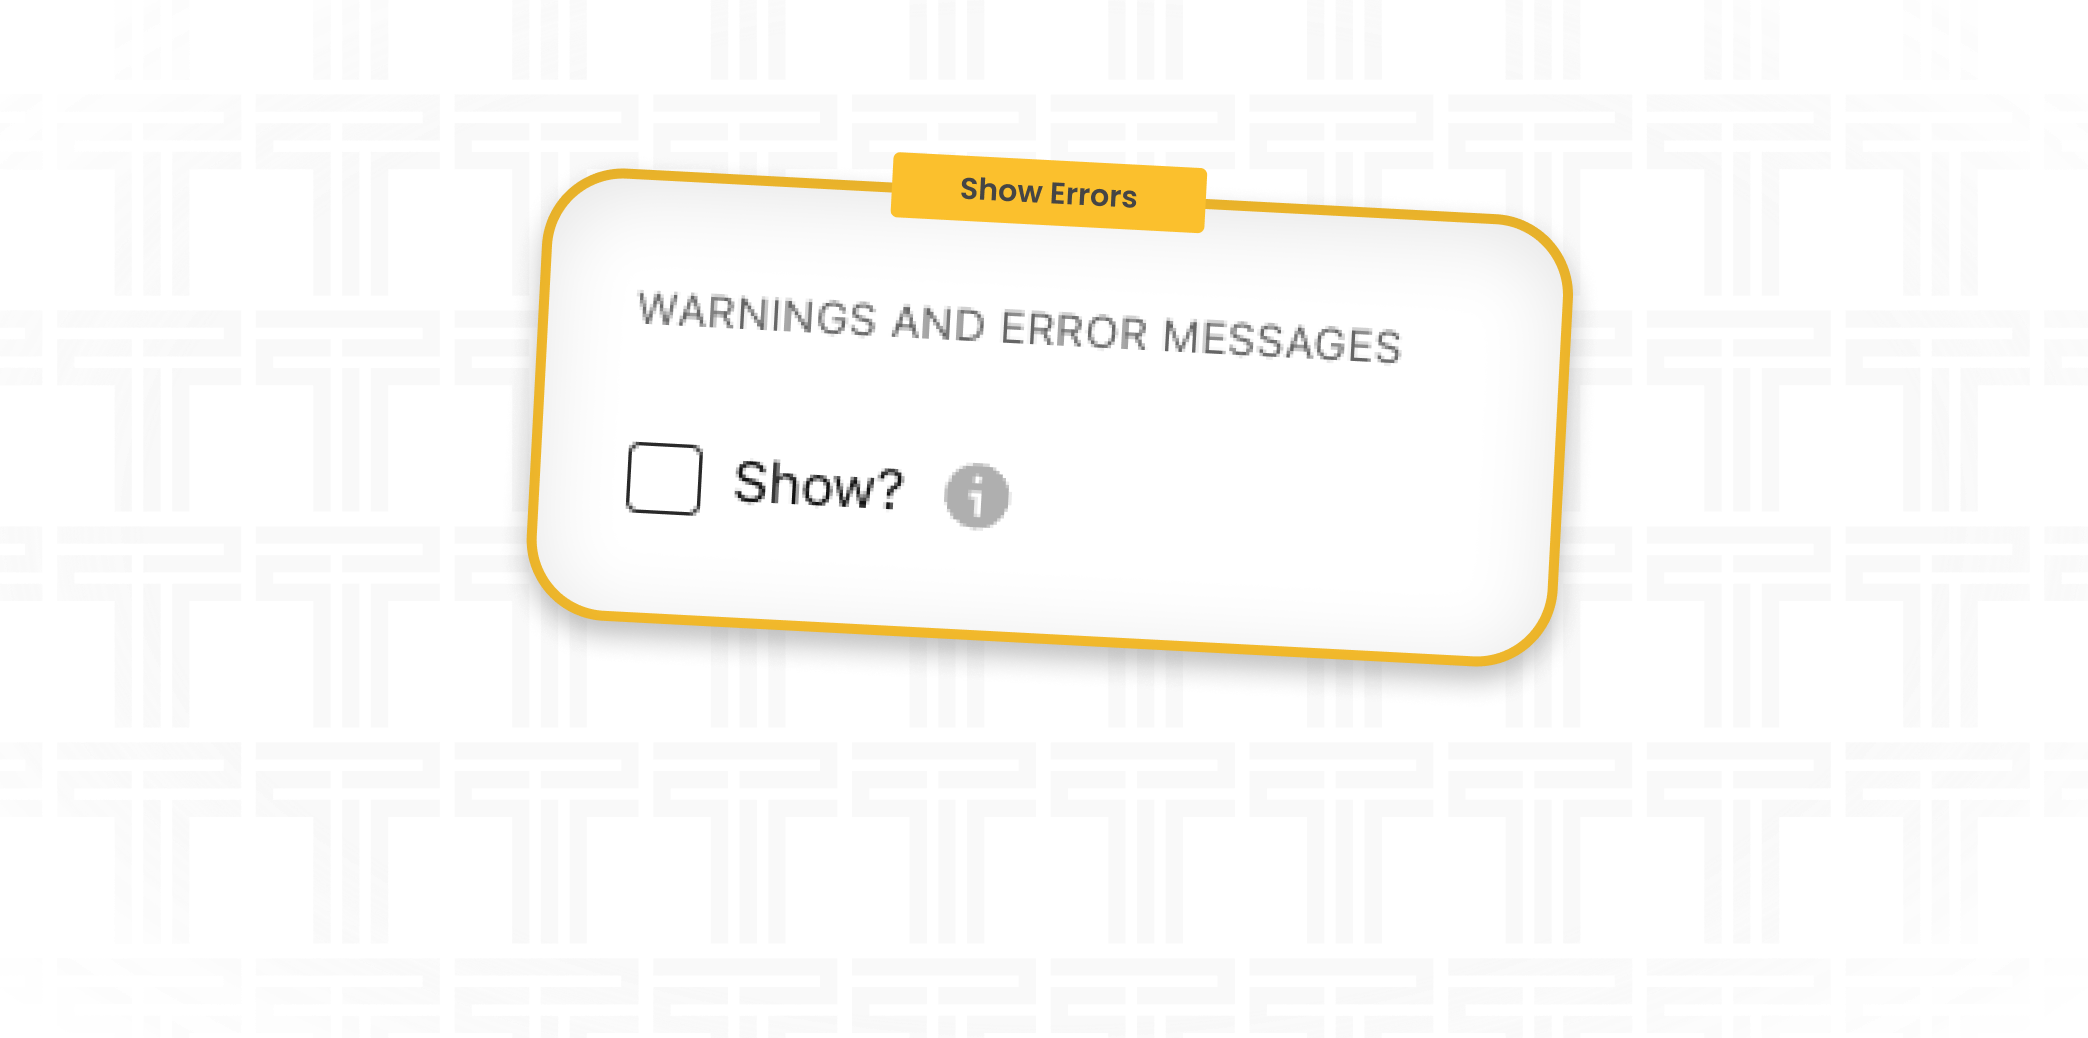
Warnings and Error Messages
By selecting the toggle, the info table will show any errors or warning messages. These errors or warnings are generally when you are on a timeframe higher than the selected fractal model. If unselected, you will not recieve these reminders regarding the warnings and errors.
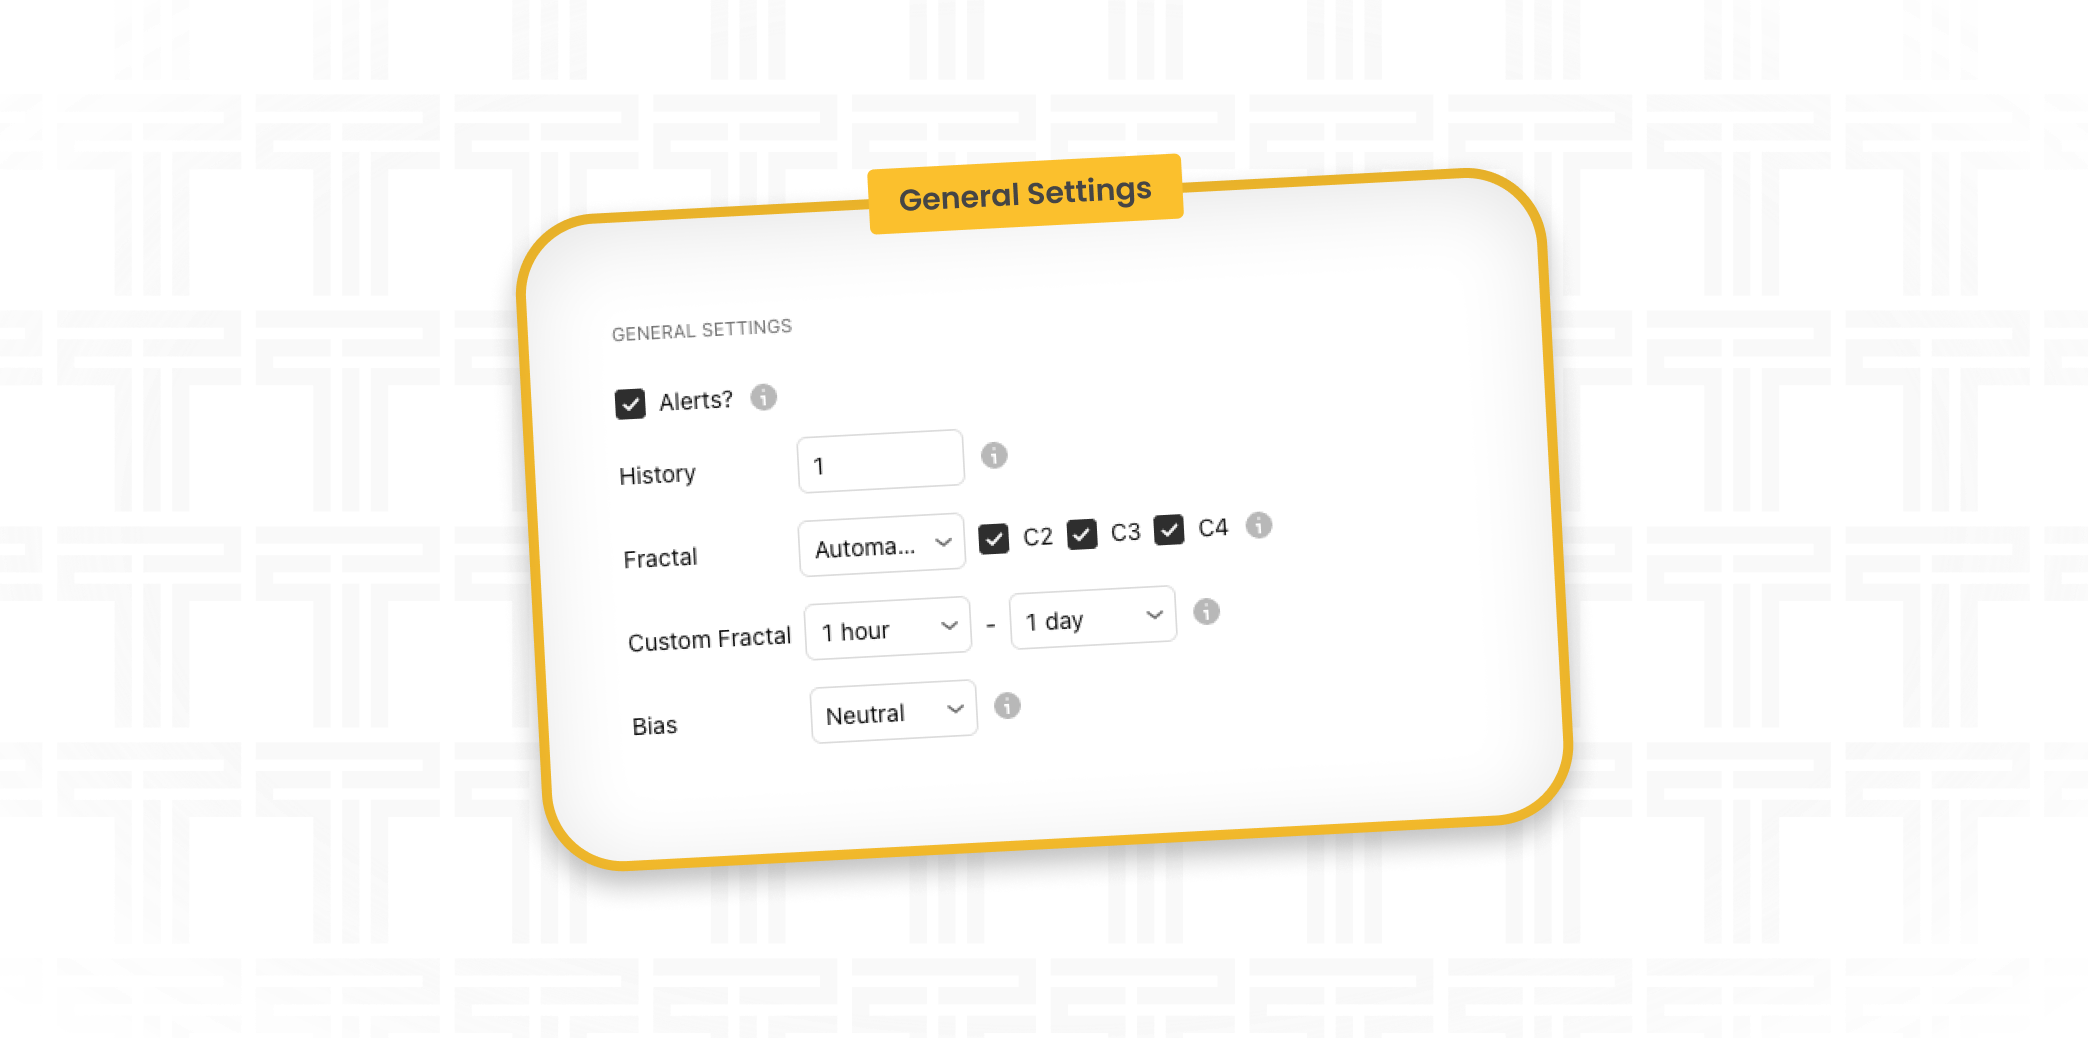
General Settings
This is the core of the indicator. It controls how data is processed, what gets displayed on your chart, and how alerts and bias factor in.
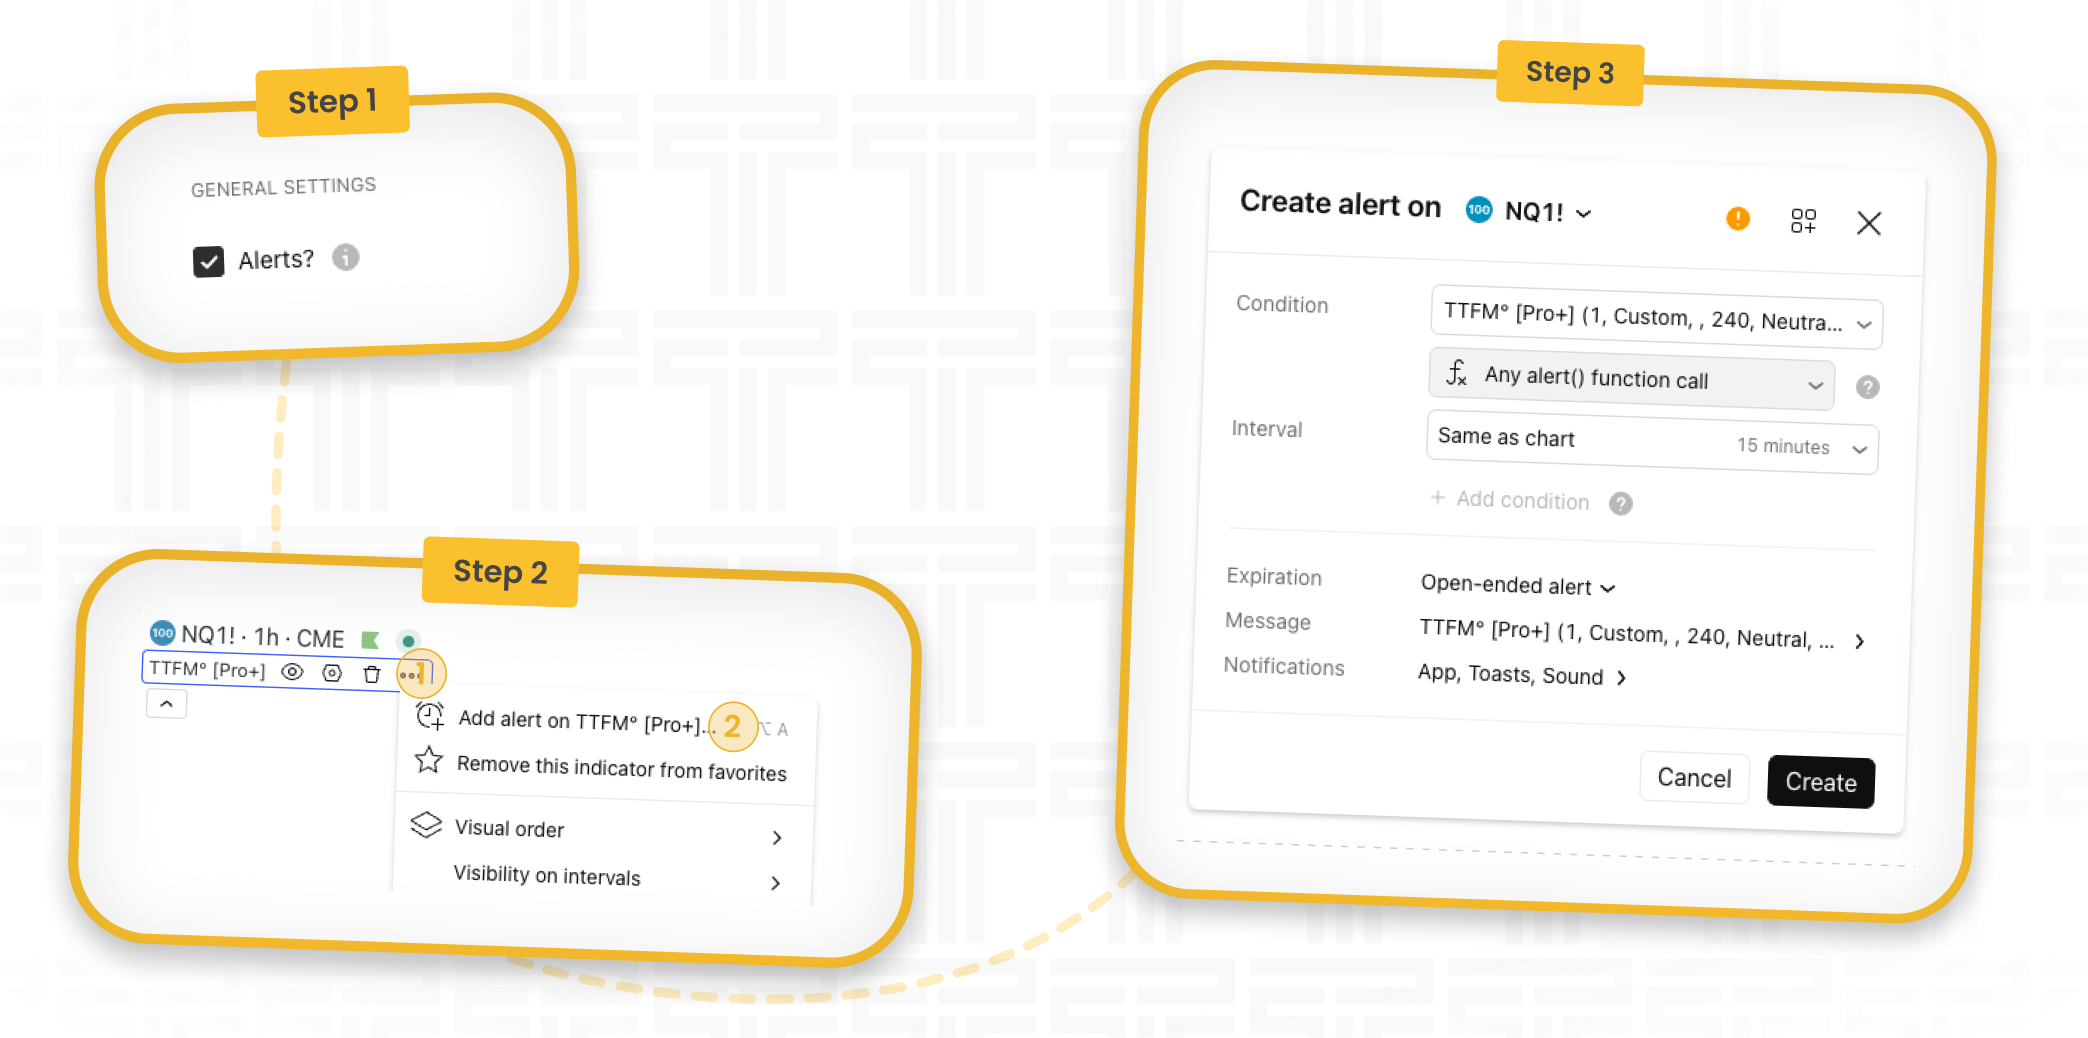
Alerts
The Alerts setting enables or disables automatic alert functionality for Fractal Model formations. When this setting is turned off, no alerts will be able to be created.
To use alerts, this setting must be enabled first. Alerts are real time and generated based on all the current settings the Indicator is set to. ((give settings on how to apply alerts
If you want alerts across multiple time frames, this process can be repeated using a different time frame within the settings of the indicator.
The easiest way to deploy alerts across multiple assets is to create a watchlist (requires premium TradingView subscription), then open any symbol from that list on the timeframe you desire time frame to alert fractal setups. From there, click the three-dot menu on the indicator, select the symbol option, and apply the watchlist. This will create the same alert setup across all assets in that watchlist.
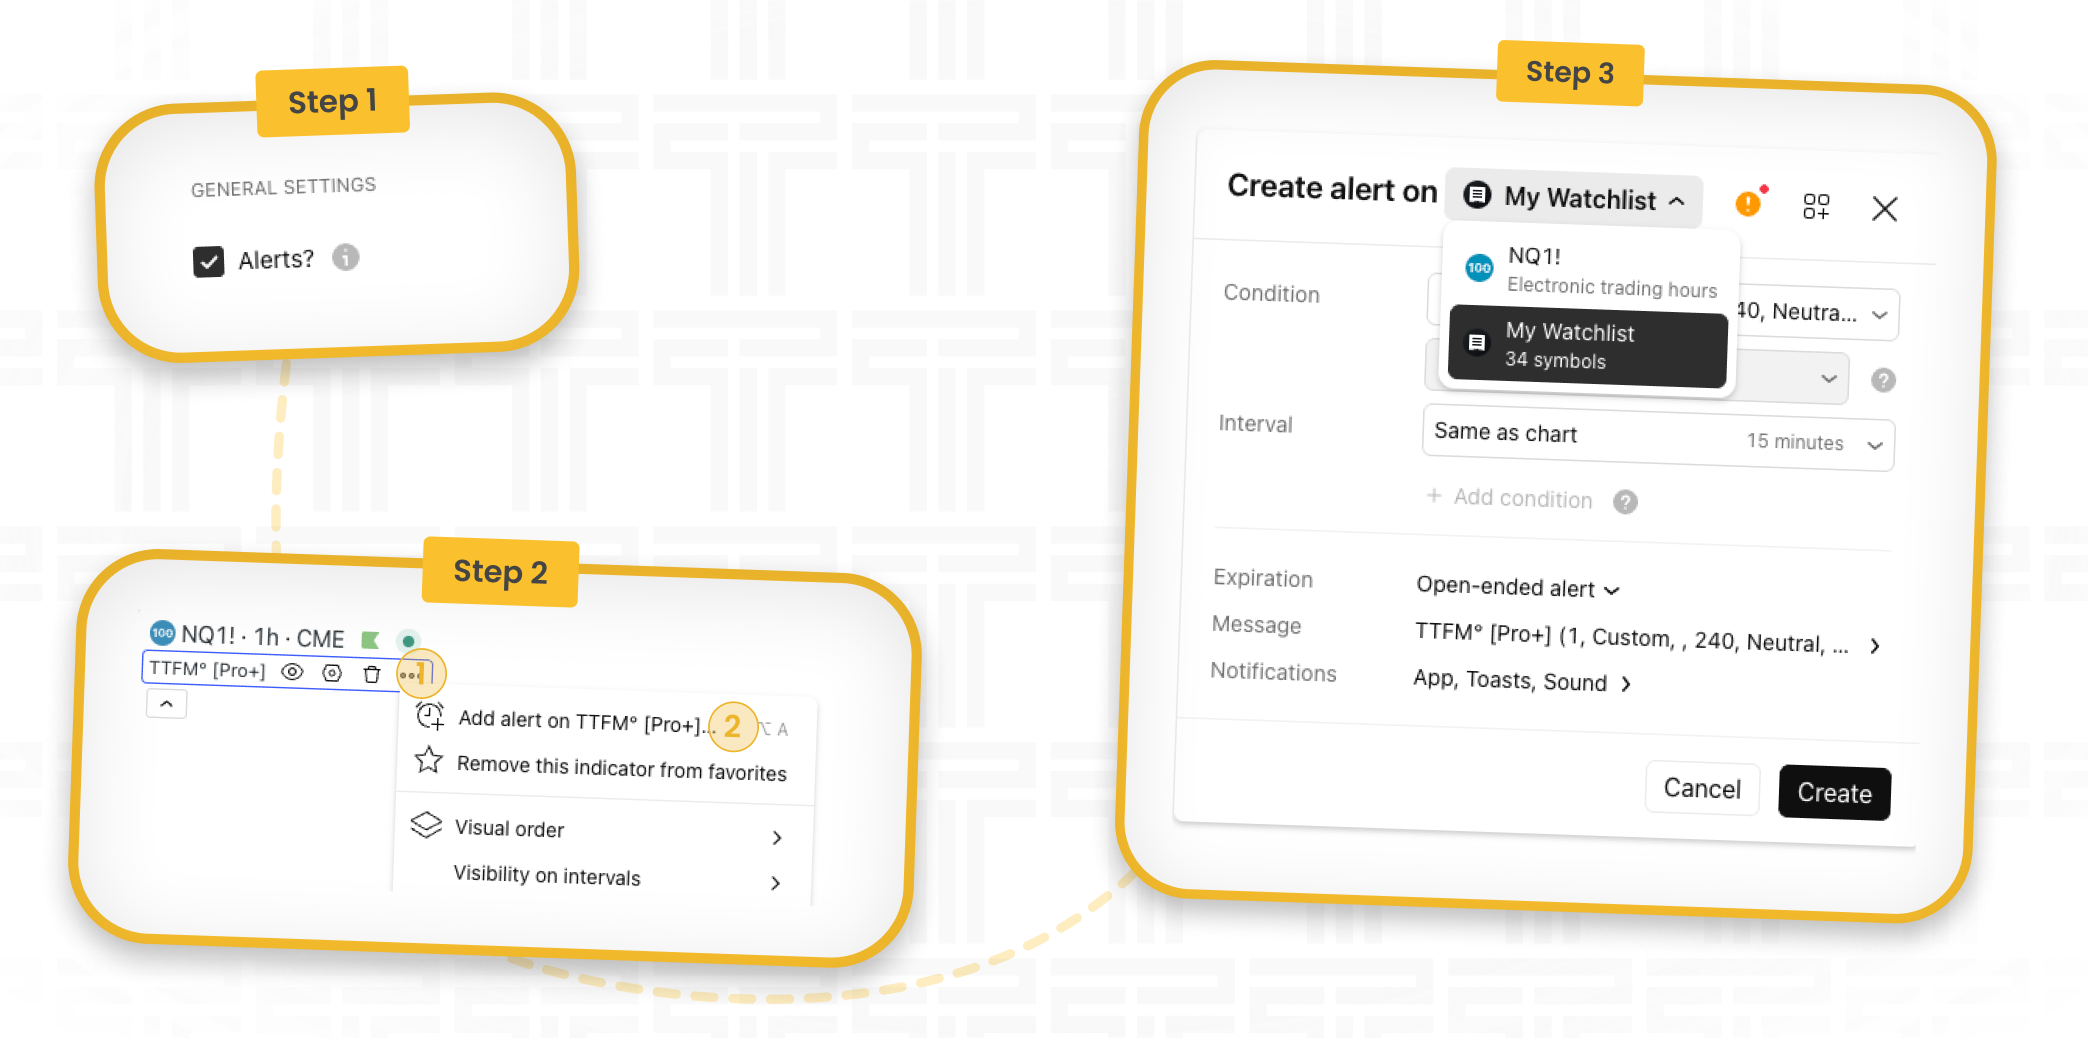
Beware of a TradingView bug that occasionally will pause an open-ended alert. To fix, simply restart the alerts from the TradingView alerts panel.
History
Controls how many past Fractal Models appear on your chart. Set it to 0 and you’ll only see the current one. Bump it up if you want to see how previous formations played out. Each number higher or lower will include both a bearish and bullish setup. If your chart starts feeling cluttered, you may want to reduce this number.
Fractal
The fractal toggle sets the timeframe the indicator is using. Automatic will naturally adjusts based on your current chart timeframe, while the other selections will print the selected timeframe, no matter your chart timeframe selection. Custom allows you to use the Custom Fractal drop downs to have a custom timeframe fractal model.
C2/C3/C4
These checkboxes show or hide the fractal model inside the specific candles. Useful for decluttering your chart if you only care about specific parts of the formation.
C2 will show candle 2 closure formations. C3 will show candle 3 closure formations. C4 will show candle 4 continuations.
Custom Fractal
Only active when Fractal is set to Custom. Lets you dial in a custom timeframe alignment manually rather than using the provided alignments.
Bias
Bias Filters what the indicator displays based on market direction. There are five options.
Neutral shows everything, both bullish and bearish Fractal Models at the same time. This is the default option and a good place to start while you’re getting familiar with the indicator.
Bullish shows only Bullish Fractal Models, which is useful when you’ve got a clear upside read for the session and want to cut out the noise.
Bearish shows only Bearish Fractal Models, which is useful for only seeing bearish setups.
Auto Bias 1 automatically references a higher timeframe fractal model one timeframe above your selected fractal.
Auto Bias 2 automatically references a higher timeframe fractal model two timeframes above your selected fractal.
For example if using the hourly and 5 minute fractal model, auto bias 1 would reference the 4 Hour and 15 Minute model, while auto bias 2 would reference the Daily and 1 Hour model.
This is useful if you only want to see the lower timeframe fractal model that is in line with a higher timeframe model.
When you’re first starting out with the indicator, try it on Neutral so you can see the full picture. Once you’ve built a directional read for the session, you can then switch to Bullish or Bearish to filter things down.
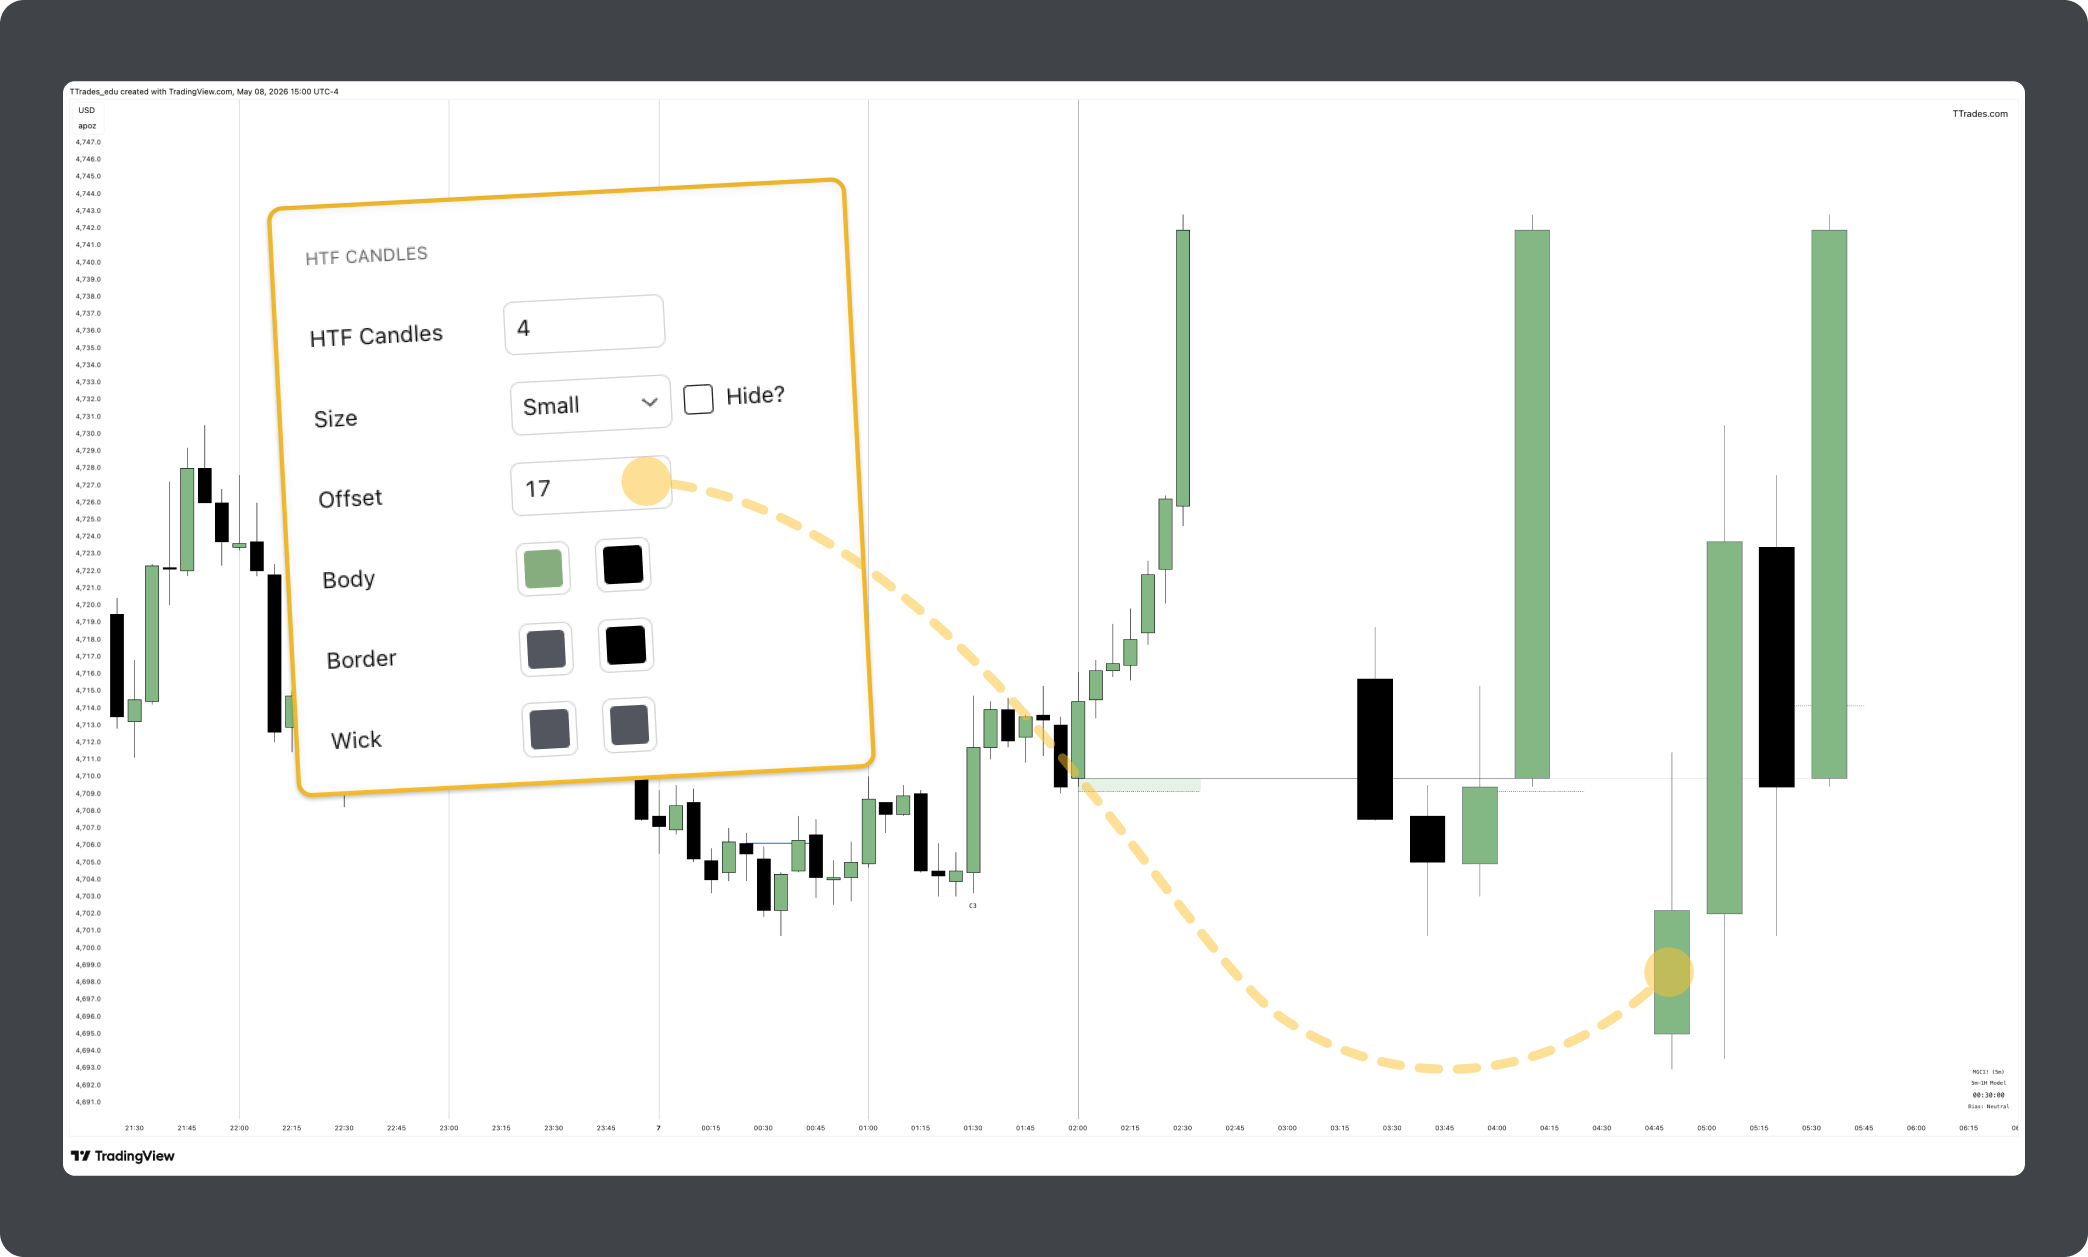
HTF Candles
These settings control the Higher Time Frame candles displayed on the right side of your chart. They allow you to analyze higher time frame structure and candle behavior while staying locked in to your execution time frame.
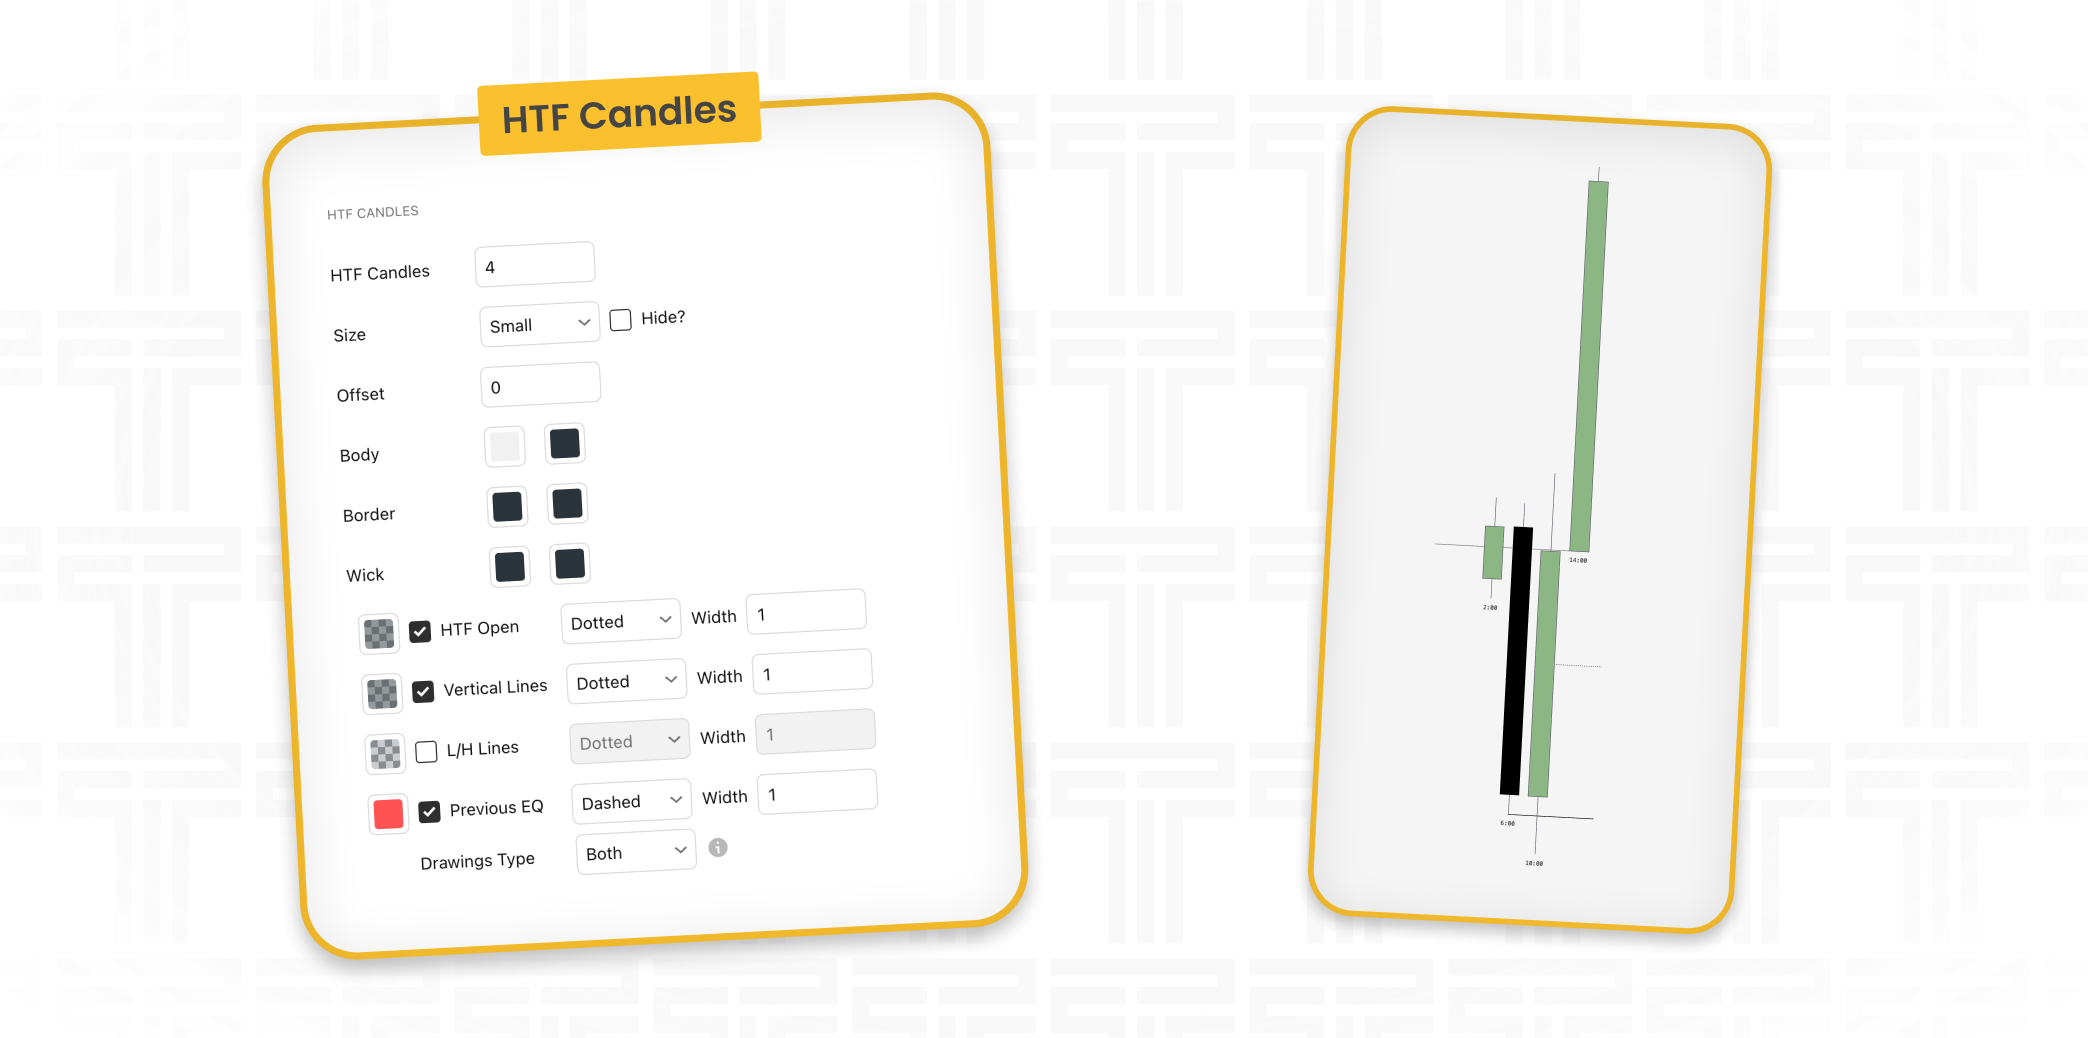
HTF Candles
This setting allows you to choose the number of higher time frame (HTF) candles you want to view. Default is 4, but the arrows can be used to view more than 4 candles.
Size
Size controls how large the HTF candles appear. You can also hide them entirely if you’d rather not view them.
Offset
Offset pushes the HTF candles horizontally to the right on the chart. If you’re running multiple TTFM indicators at once, use this to keep them from stacking on top of each other. Just bump the offset up on one of the indicators to push it out to the side. 17 is a good number for the second indicator if you are stacking time frames.
Body, Border, Wick
Customize the bullish and bearish candle colors to match your chart setup.
HTF Open
The High Time Frame Opens setting plots the opening price of the higher time frame fractal that corresponds with your current chart, giving you a clear view of where price opened. For example, on the 5-minute chart it displays the hourly open, automatically plotting the opening price of the higher timeframe in the fractal.
Vertical Lines
The Vertical Lines setting plots vertical lines aligned with the higher time frame fractal of your current chart, allowing you to clearly see when each new higher time frame period begins. These are plotted in the same fractal alignment logic as the High Time Frame Opens setting.
L/H Lines
The L/H Lines setting marks out the previous higher timeframe candles lows and highs. Many use these as key levels of liquidity, however by default, TTrades keeps them off.
Previous EQ
The Previous EQ setting plots the midpoint, or 50% of the previous higher time frame candle. This level represents the equilibrium of the prior candle’s range, which is a vital component of TTrades Fractal Model.
Drawing Type
On Chart will only display the drawings on the chart, within the current lower timeframe.
HTF candle will only display the drawings on the higher time frame candle.
Both will put the drawings on both the chart as well as the HTF candles.
HTF Candle Time Labels
The HTF Labels setting displays time labels beneath the HTF Candles, making it easy to identify which higher time frame candle is currently being referenced on your chart.
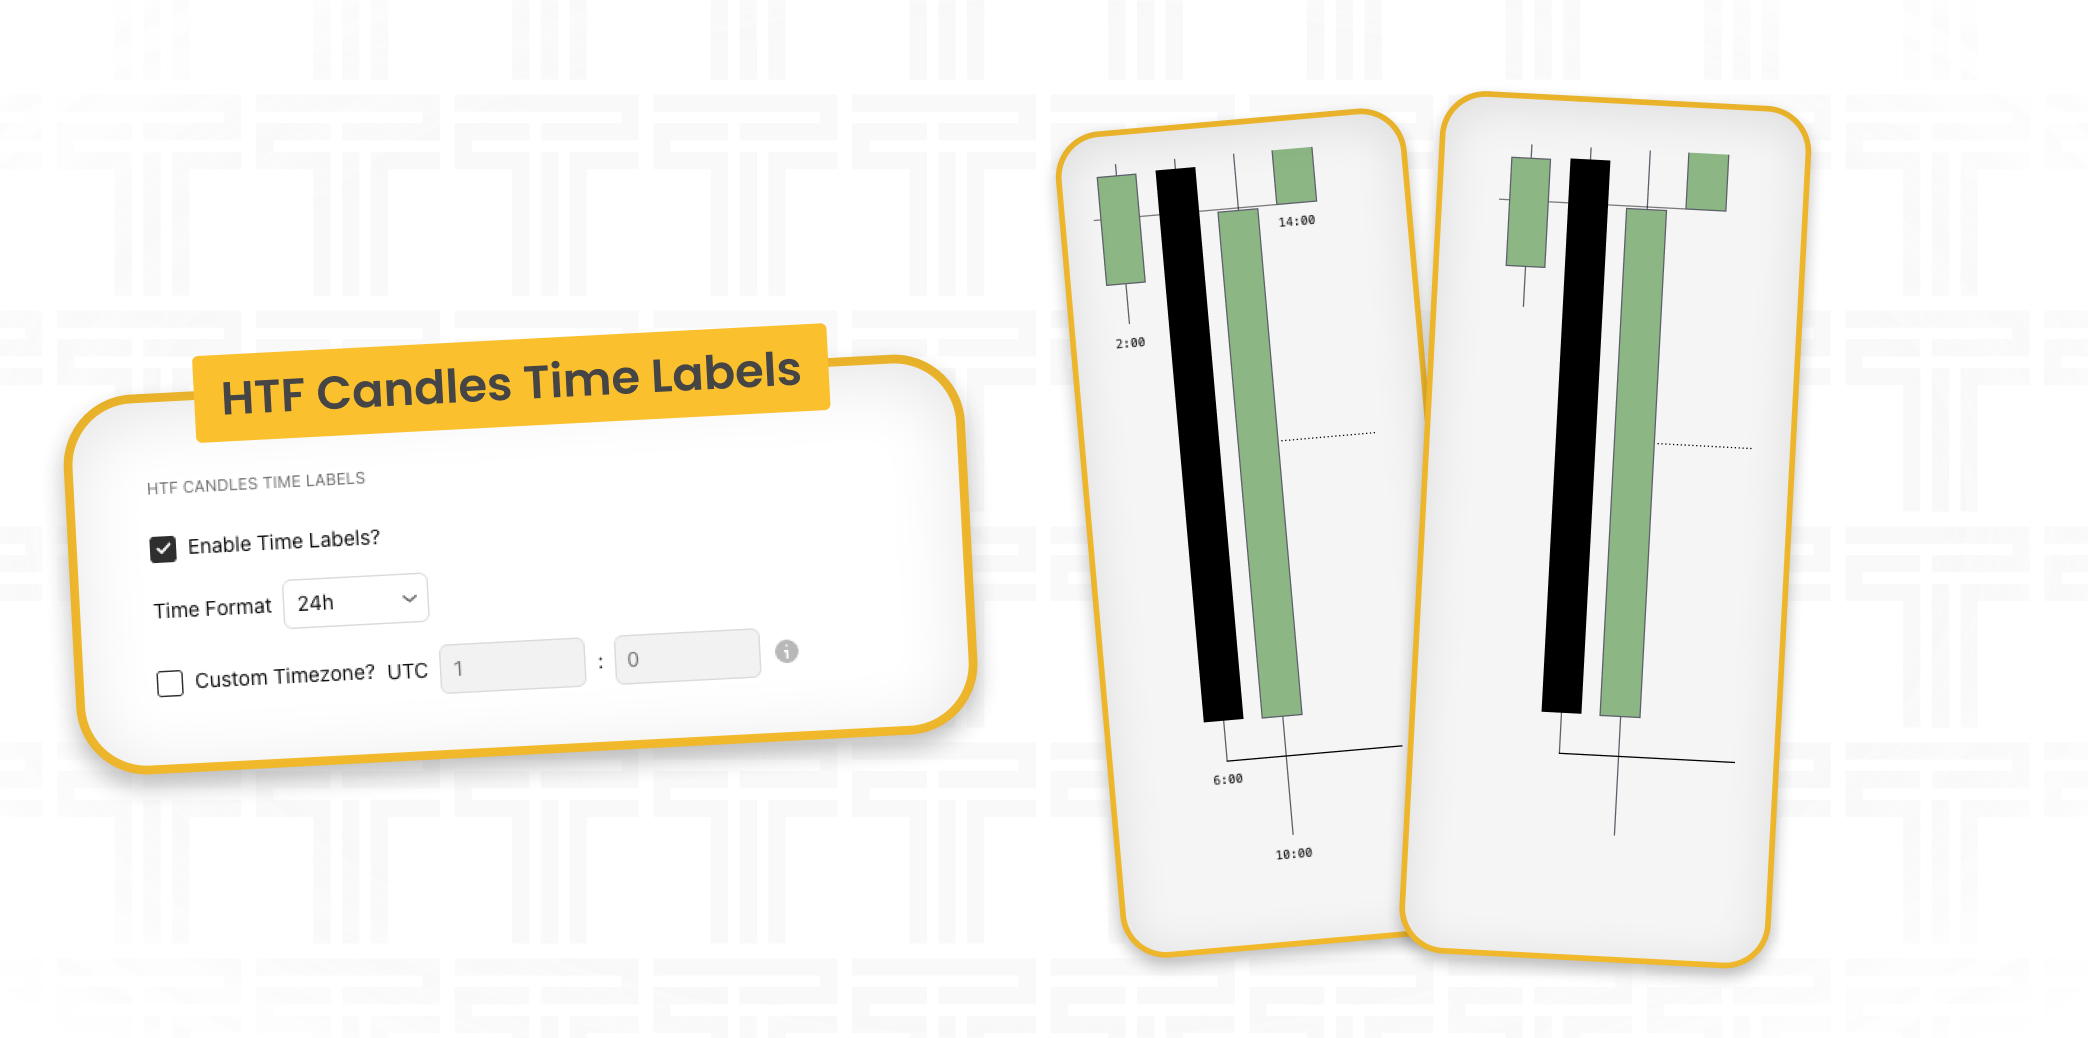
Enable Time Labels
This selection will turn on or off the time labels. The time format can be changed between 24h and AM/PM selections.
If you want to use a custom timezone, be sure to toggle that on before adjusting.
Model Style
Everything here is purely visual. None of these change how the indicator works, just how it looks on your chart.
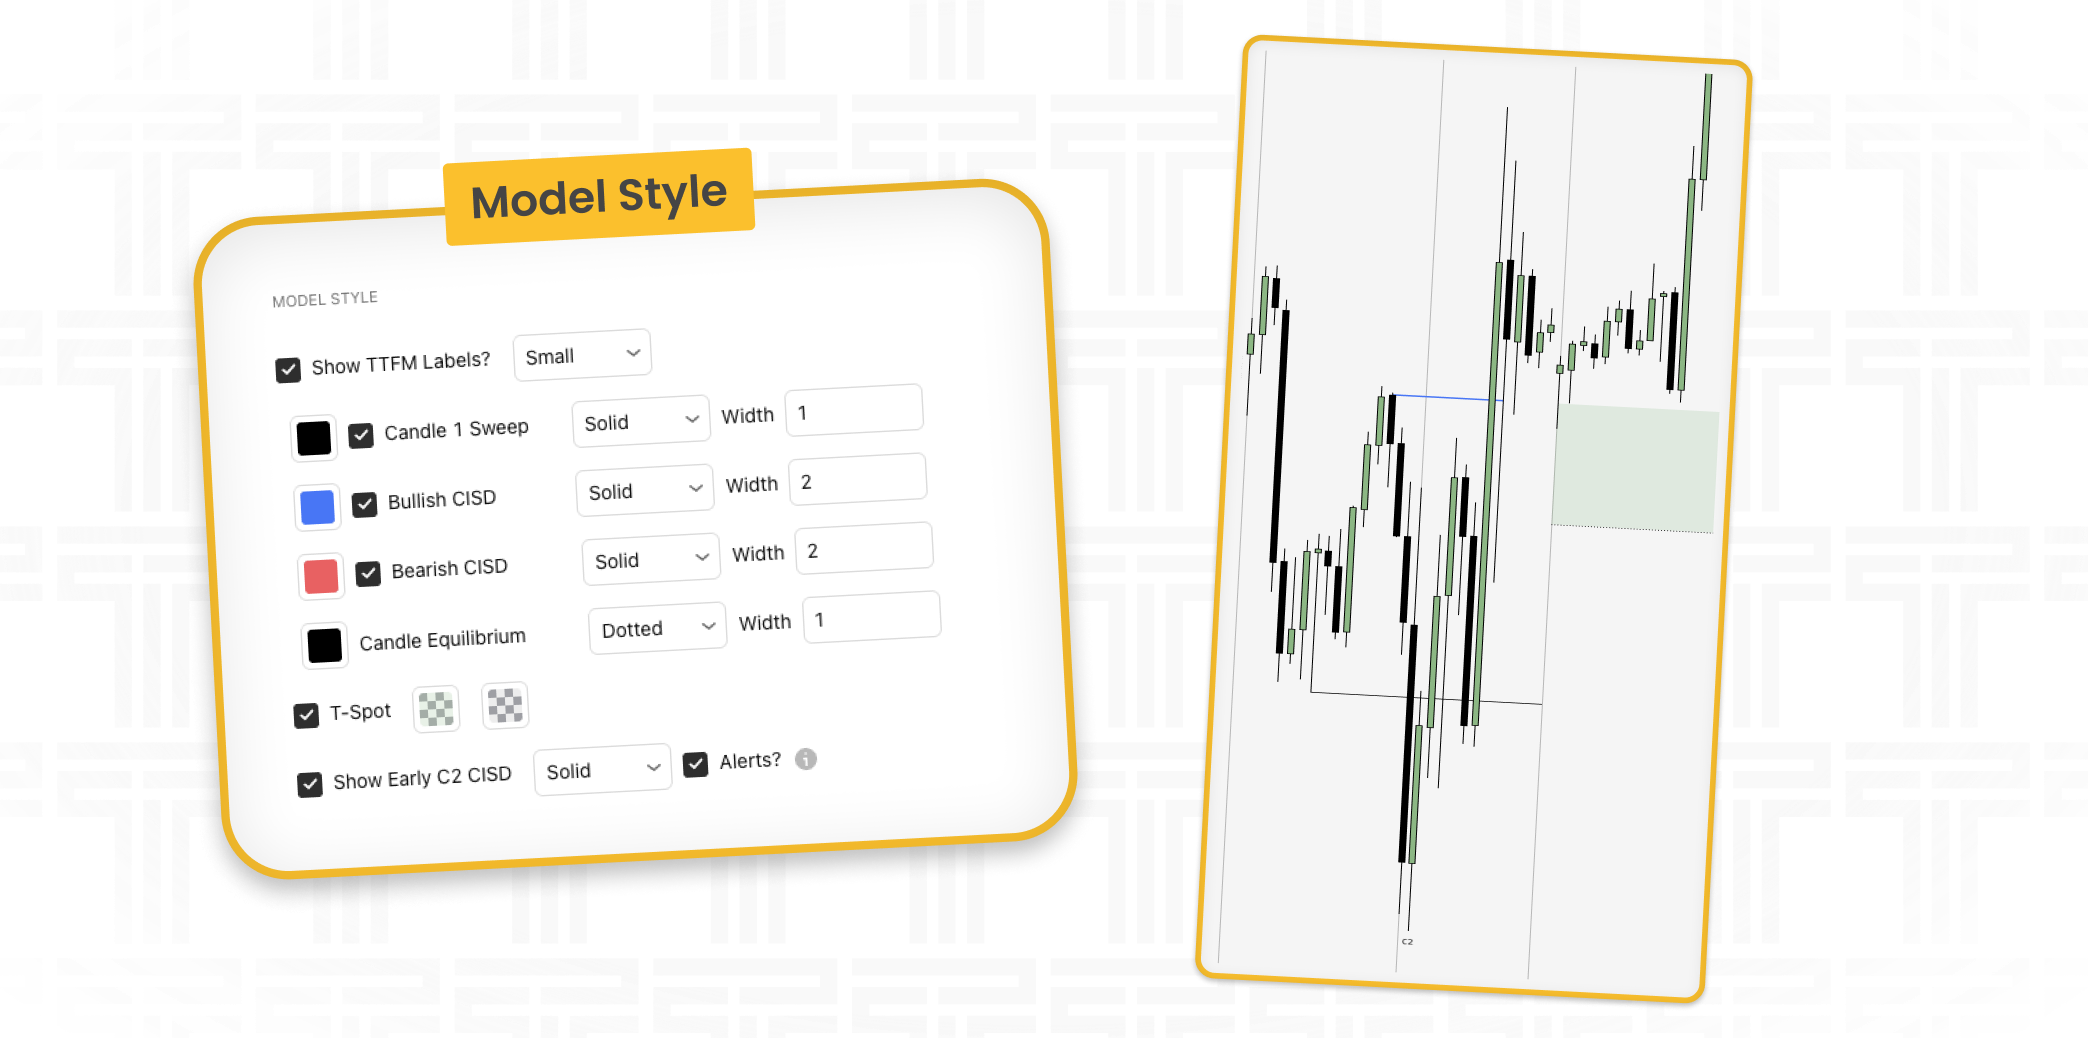
Show TTFM Labels?
Toggle the labels on or off for the Fractal Model and change their size. These are the C2, C3, C4 labels you see on the chart.
Candle 1 sweep
Show or hide the sweep line and customize its style, width, and color.
Bullish & Bearish CISD
Toggle and customize the Change in State of Delivery lines for both directions independently.
Candle Equilibrium
Show or hide the HTF Equilibrium line and adjust its appearance.
T-Spot
Toggle the T-Spot and customize how both the bullish and bearish versions appear.
Show Early C2 CISD
Displays the CISD before the higher time frame candle closes. This is a useful heads-up but not a complete model forming until the candle closes.
- Alerts : Toggle this on or off if you also want alerts of early C2 CISD when you set up alerts.
SMT Divergence
The SMT Divergence setting allows you to identify divergences between correlated markets by comparing relative highs and lows across selected instruments. When one market creates a new high or low while the correlated market fails to do the same, the indicator highlights the divergence directly on the chart. This can help reveal potential reversals.
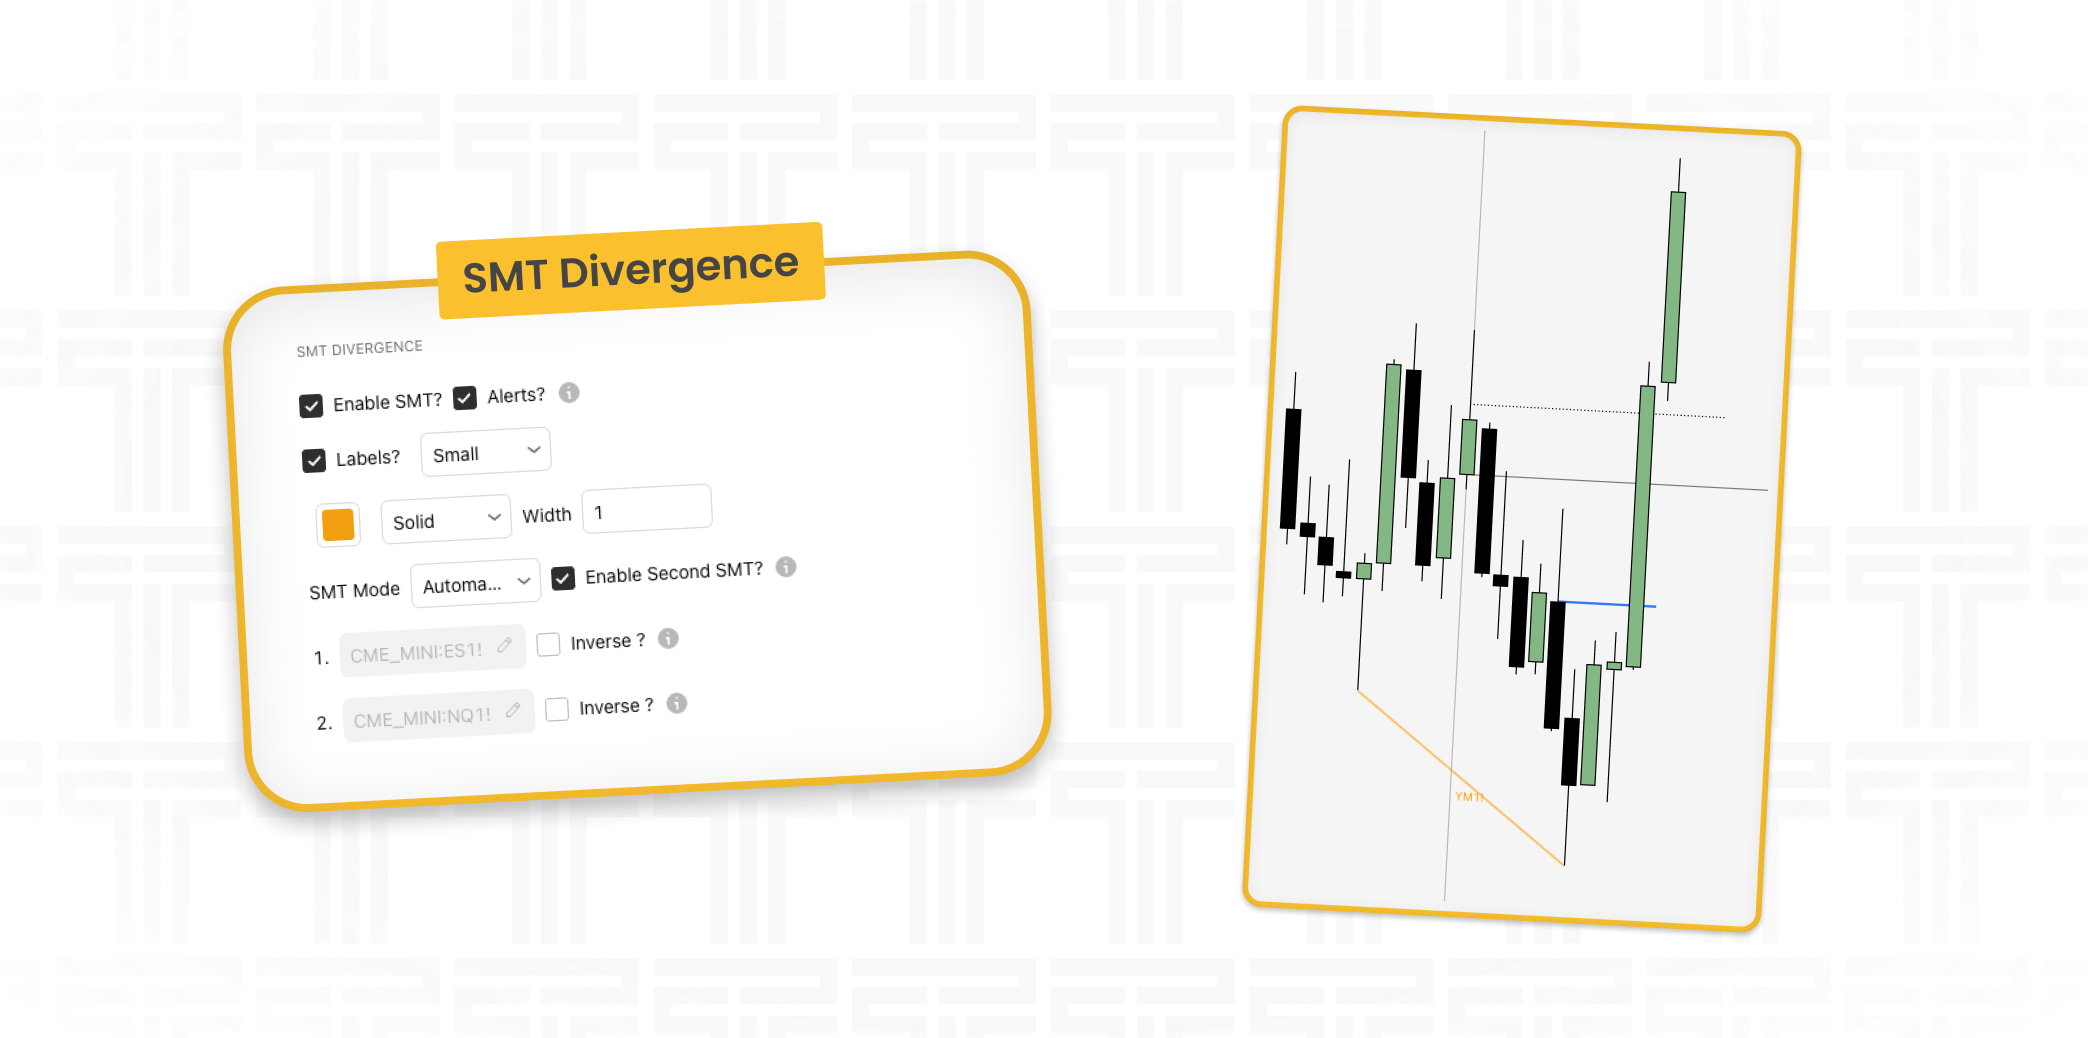
Enable SMT?
Show or hide SMT between correlated pairs
- Alerts : Toggle this on or off if you also want alerts of SMT when you set up alerts.
Labels
The SMT Labels setting displays labels with the detected SMT divergences, making it easier to identify and read each SMT. These labels are automatically aligned with their corresponding SMT setups for clean and organized charting.
SMT Mode
The SMT Mode setting allows you to choose between Automatic and Custom SMT detection.
Automatic mode scans for SMT divergences using standard correlated market pairs.
Custom mode allows you to manually input your own symbols to track SMT divergences between specific instruments of your choice. A secondary SMT pair can also be enabled if additional correlation tracking is desired. Inverse correlation can also be selected for inversely correlated pairs.
Standard Deviation Projections
These control your target projection levels.
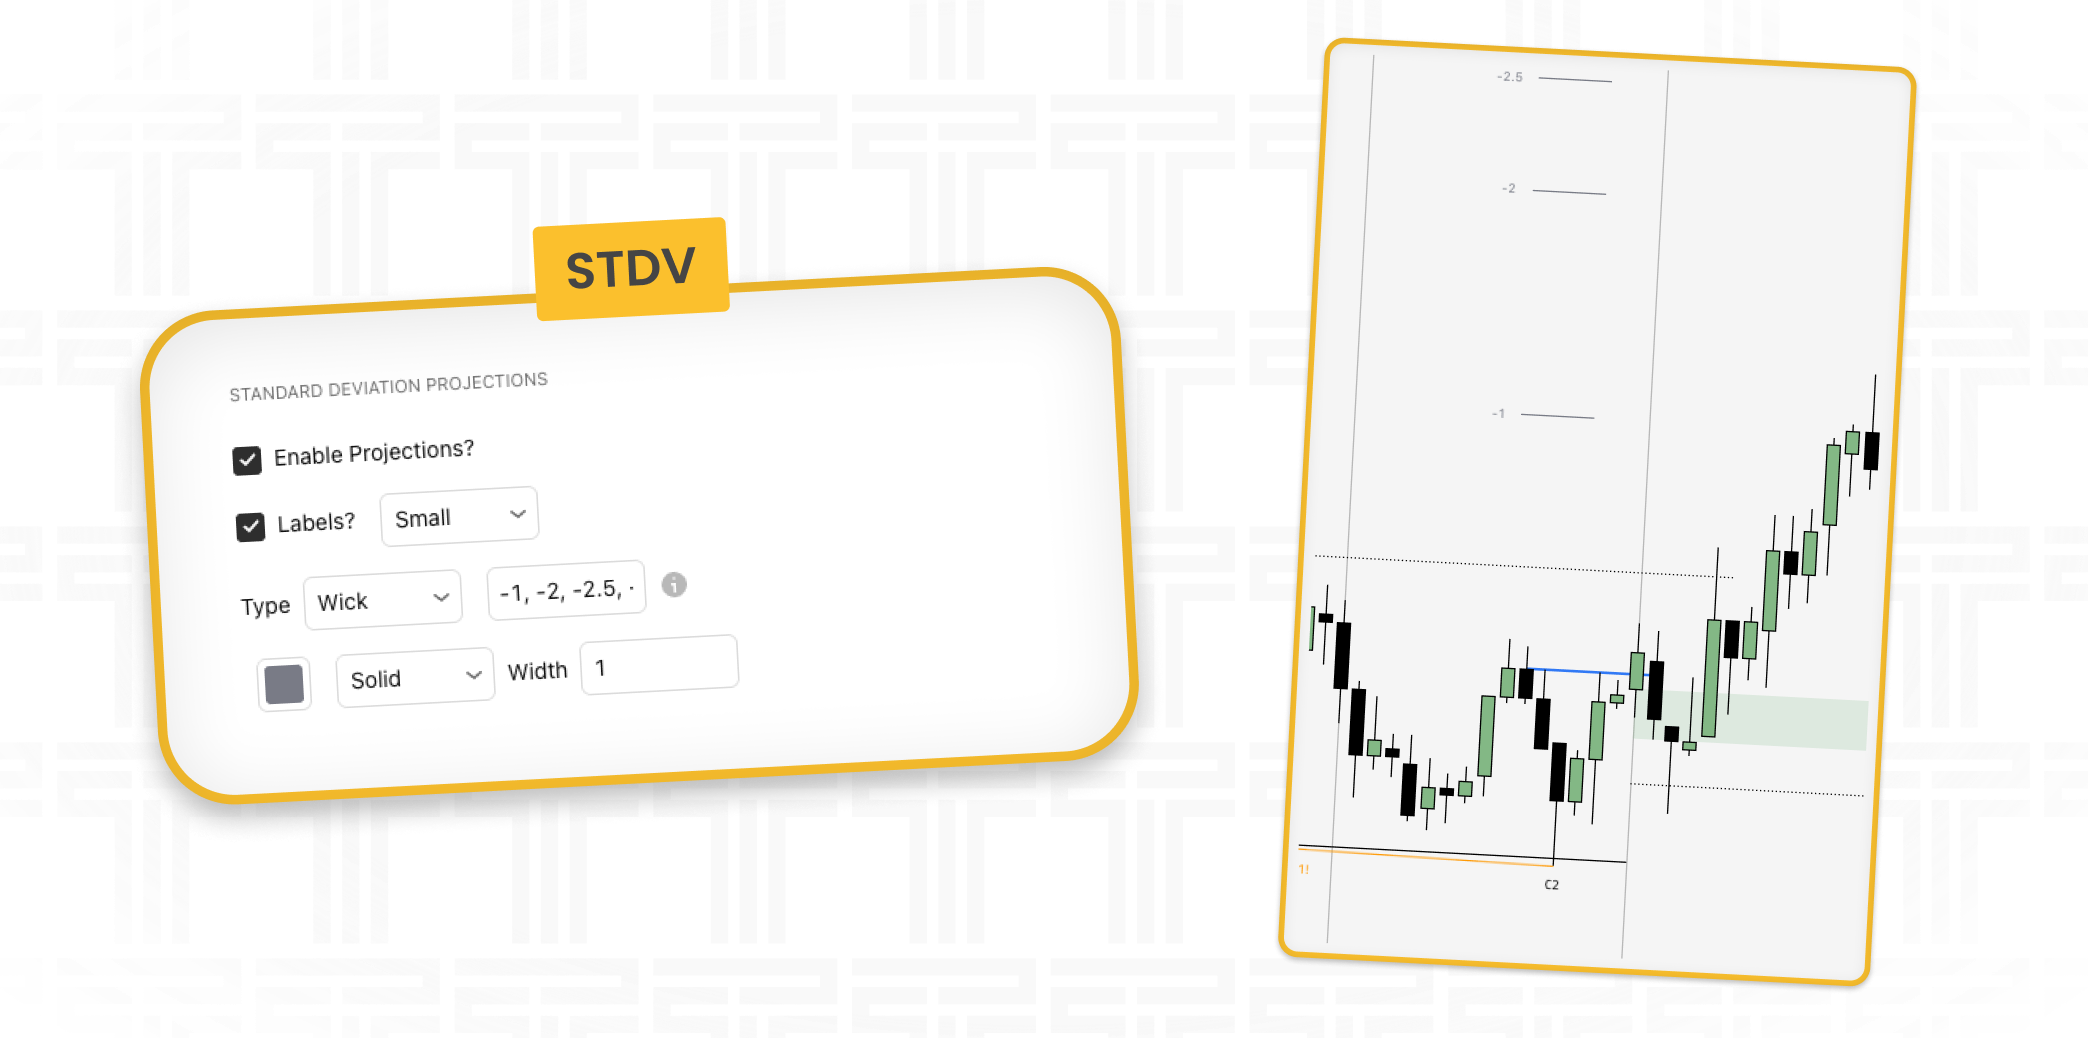
Enable Projections
Turn the STDV projection lines on or off. If standard deviation isn’t part of your approach, just hide these.
Labels
Show or hide the labels on the STDV levels and set how large they appear.
Type
Set how the STDV is calculated (Wick or Body), which values get projected (-1, -2, -2.5, etc.), and adjust the visual appearance of the lines. If you add custom numbers, make sure to use negative numbers.
Formation Liquidity
The Formation Liquidity setting enables the visualization of previous higher time frame highs and lows that are aligned with a valid fractal model. These levels are targets.
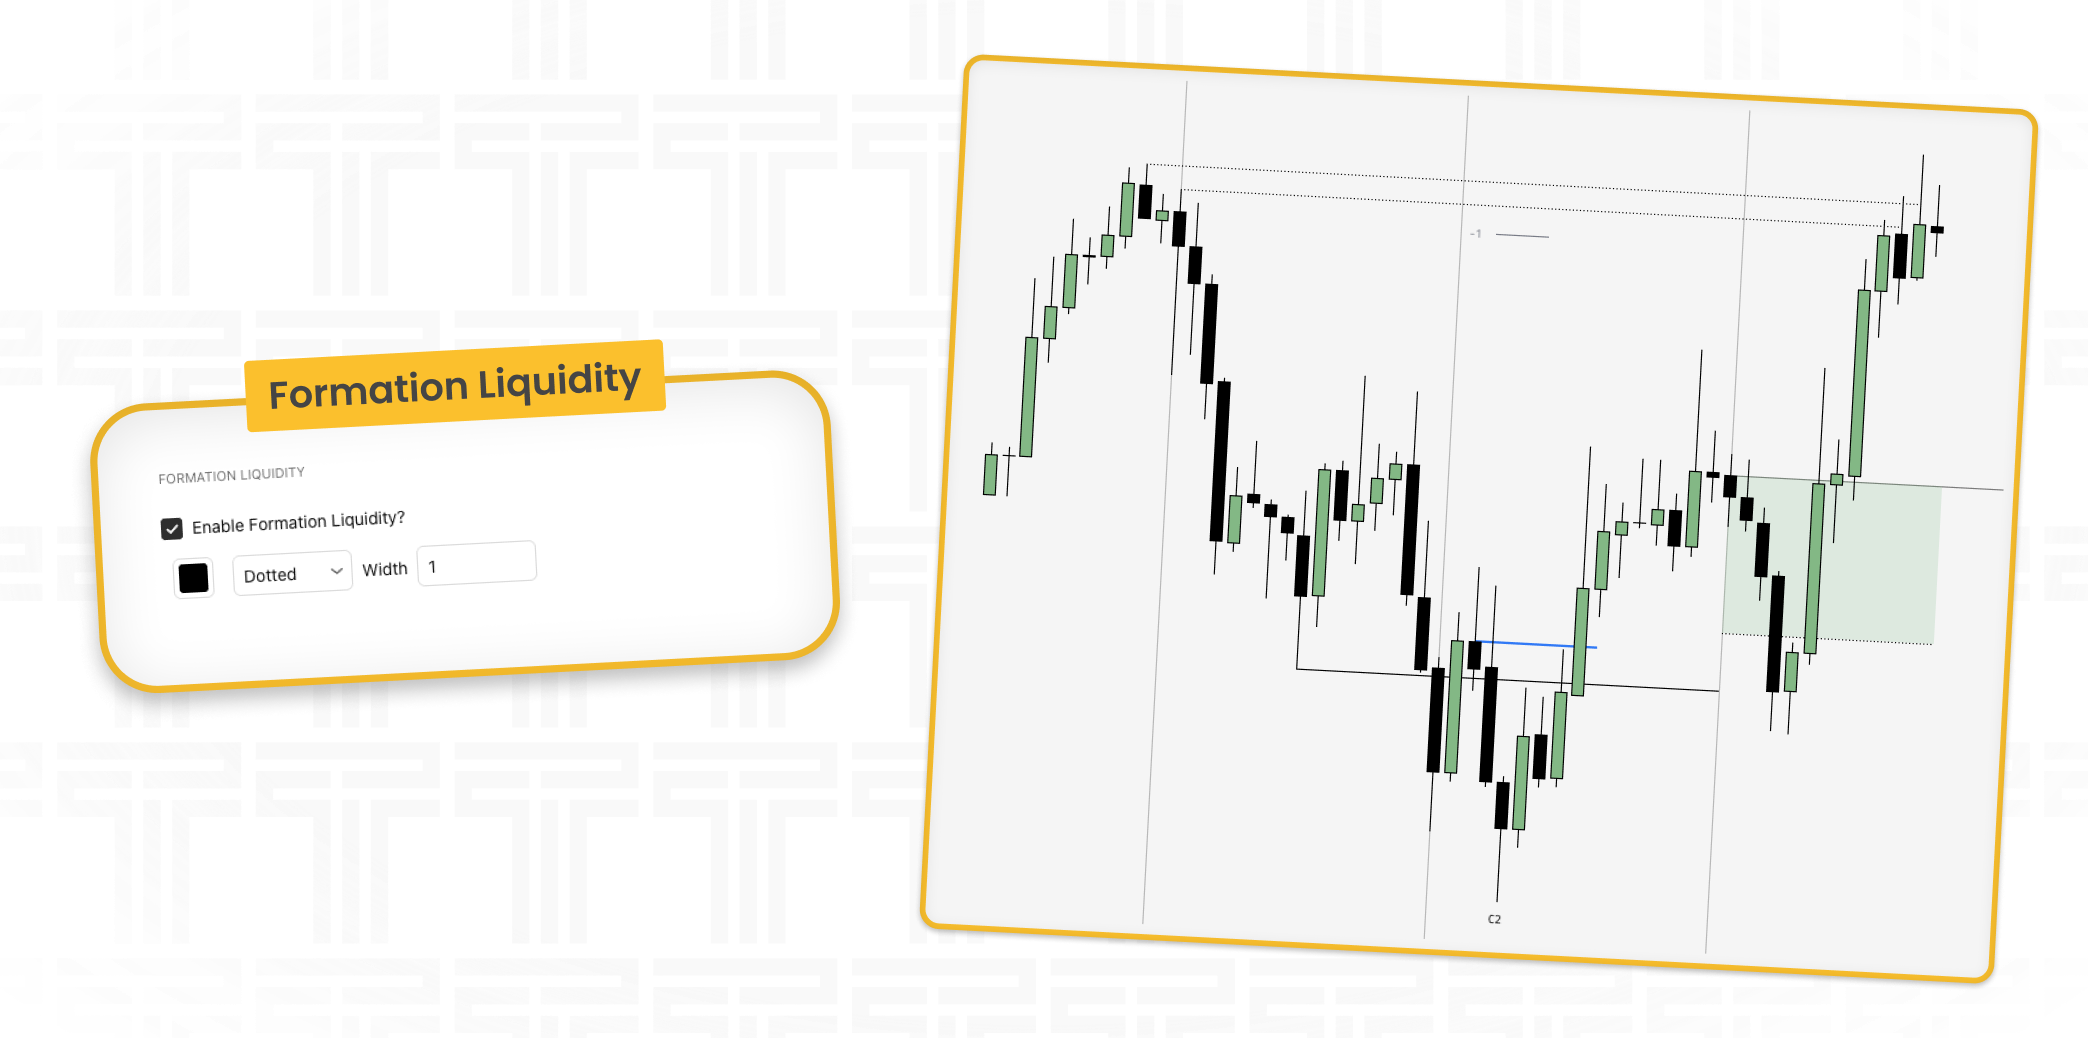
Enable Formation Liquidity
Toggles the liquidity lines that form around the previous highs and lows, marking where liquidity is resting when a model forms.
Adjust the style, width, and color of the liquidity lines.
Time Filter
The Time Filter setting allows you to restrict when the indicator will display setups based on specific user-defined time windows. This gives you the ability to filter models so they only appear during selected trading sessions or killzones, allowing you to only see models that form when you are focused on the market.
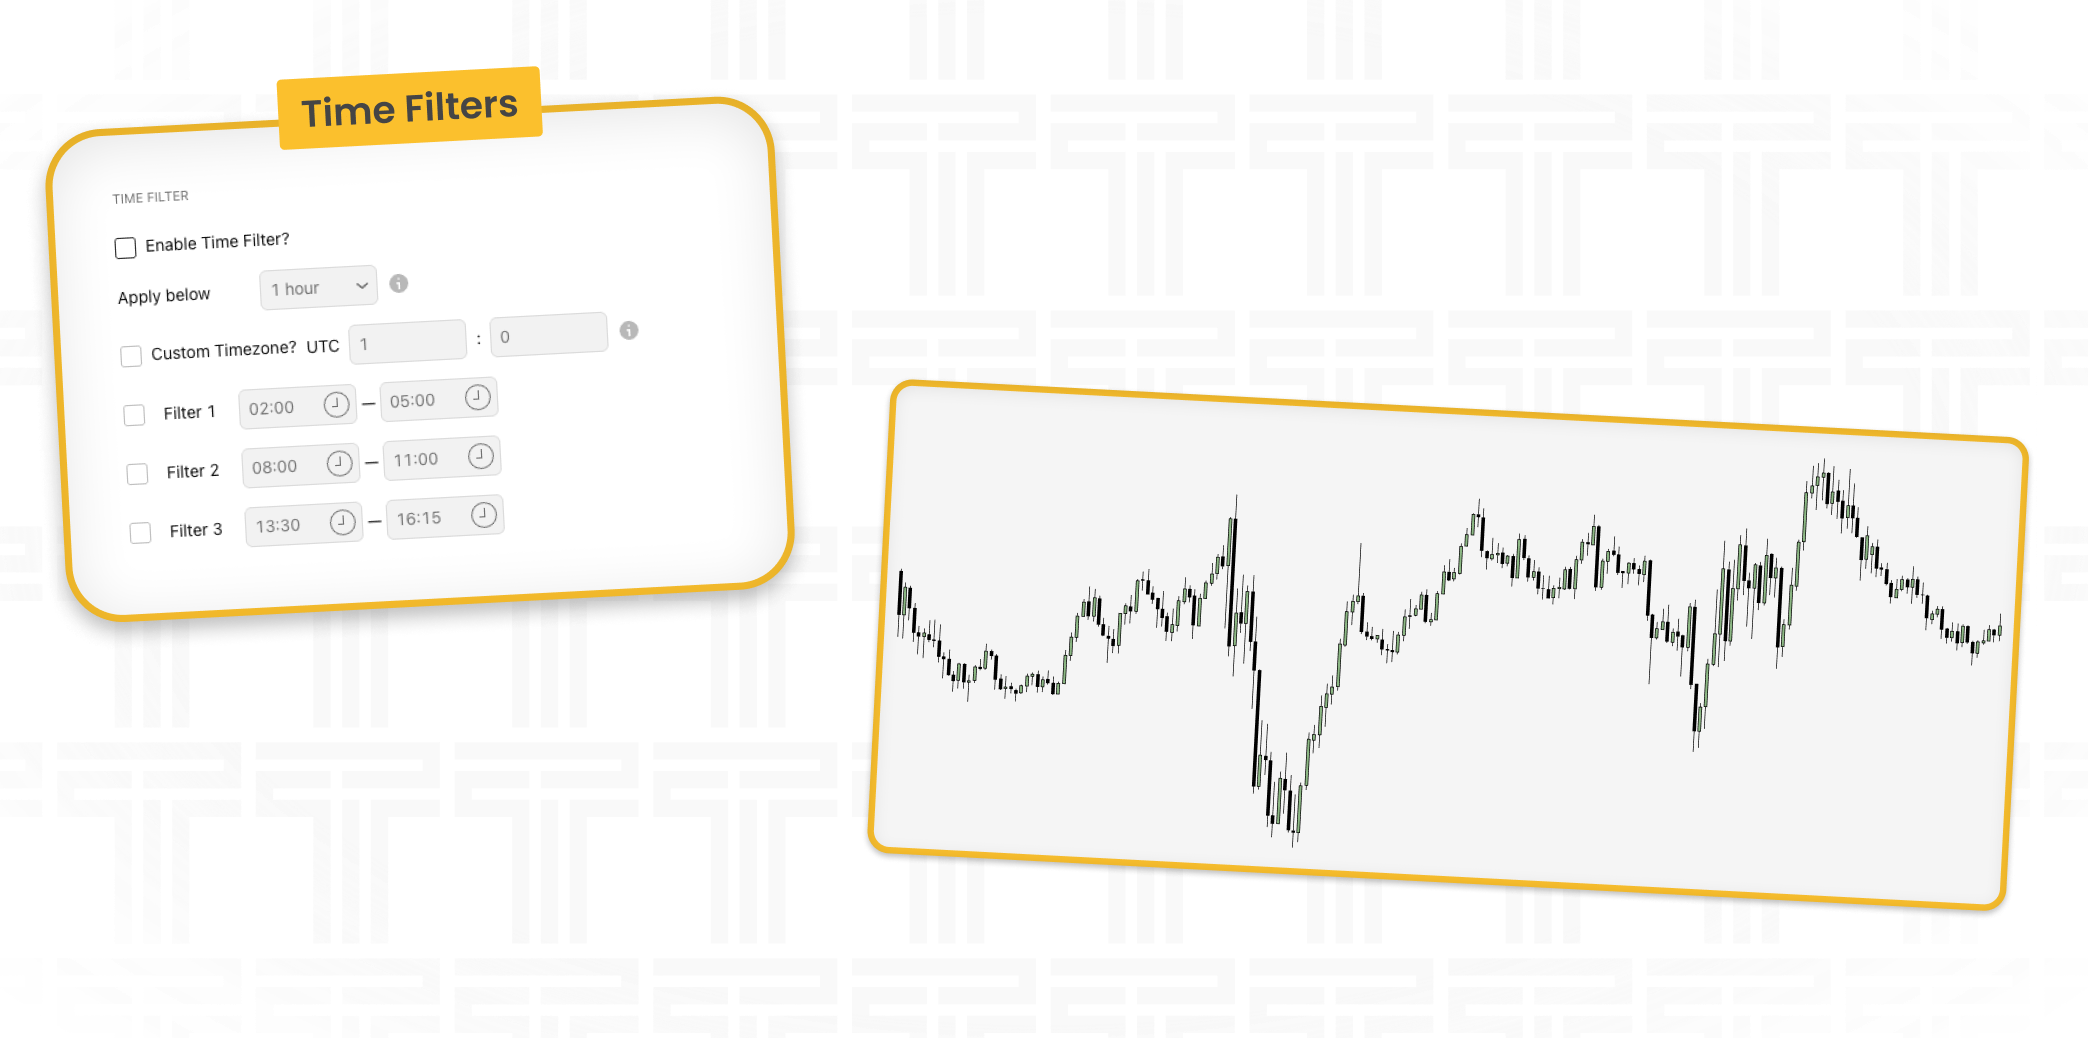
Enable Time Filter
Toggle the time filter on or off, allowing you to control whether the indicator only displays setups within your selected trading sessions or kill zones.
Apply Below
Time filters will only be applied if the current chart’s time frame is below or equal to the selected timeframe.
Filter 1, 2, 3
The Filter 1, 2, and 3 settings allow you to enable up to three separate time windows where the indicator will display setups. Each filter can be configured independently, giving you the flexibility to define multiple trading sessions or killzones within the same day for model formation
Info Table
The Info Table setting displays an overview of the information related to the TTFM model in correlation with your current settings.
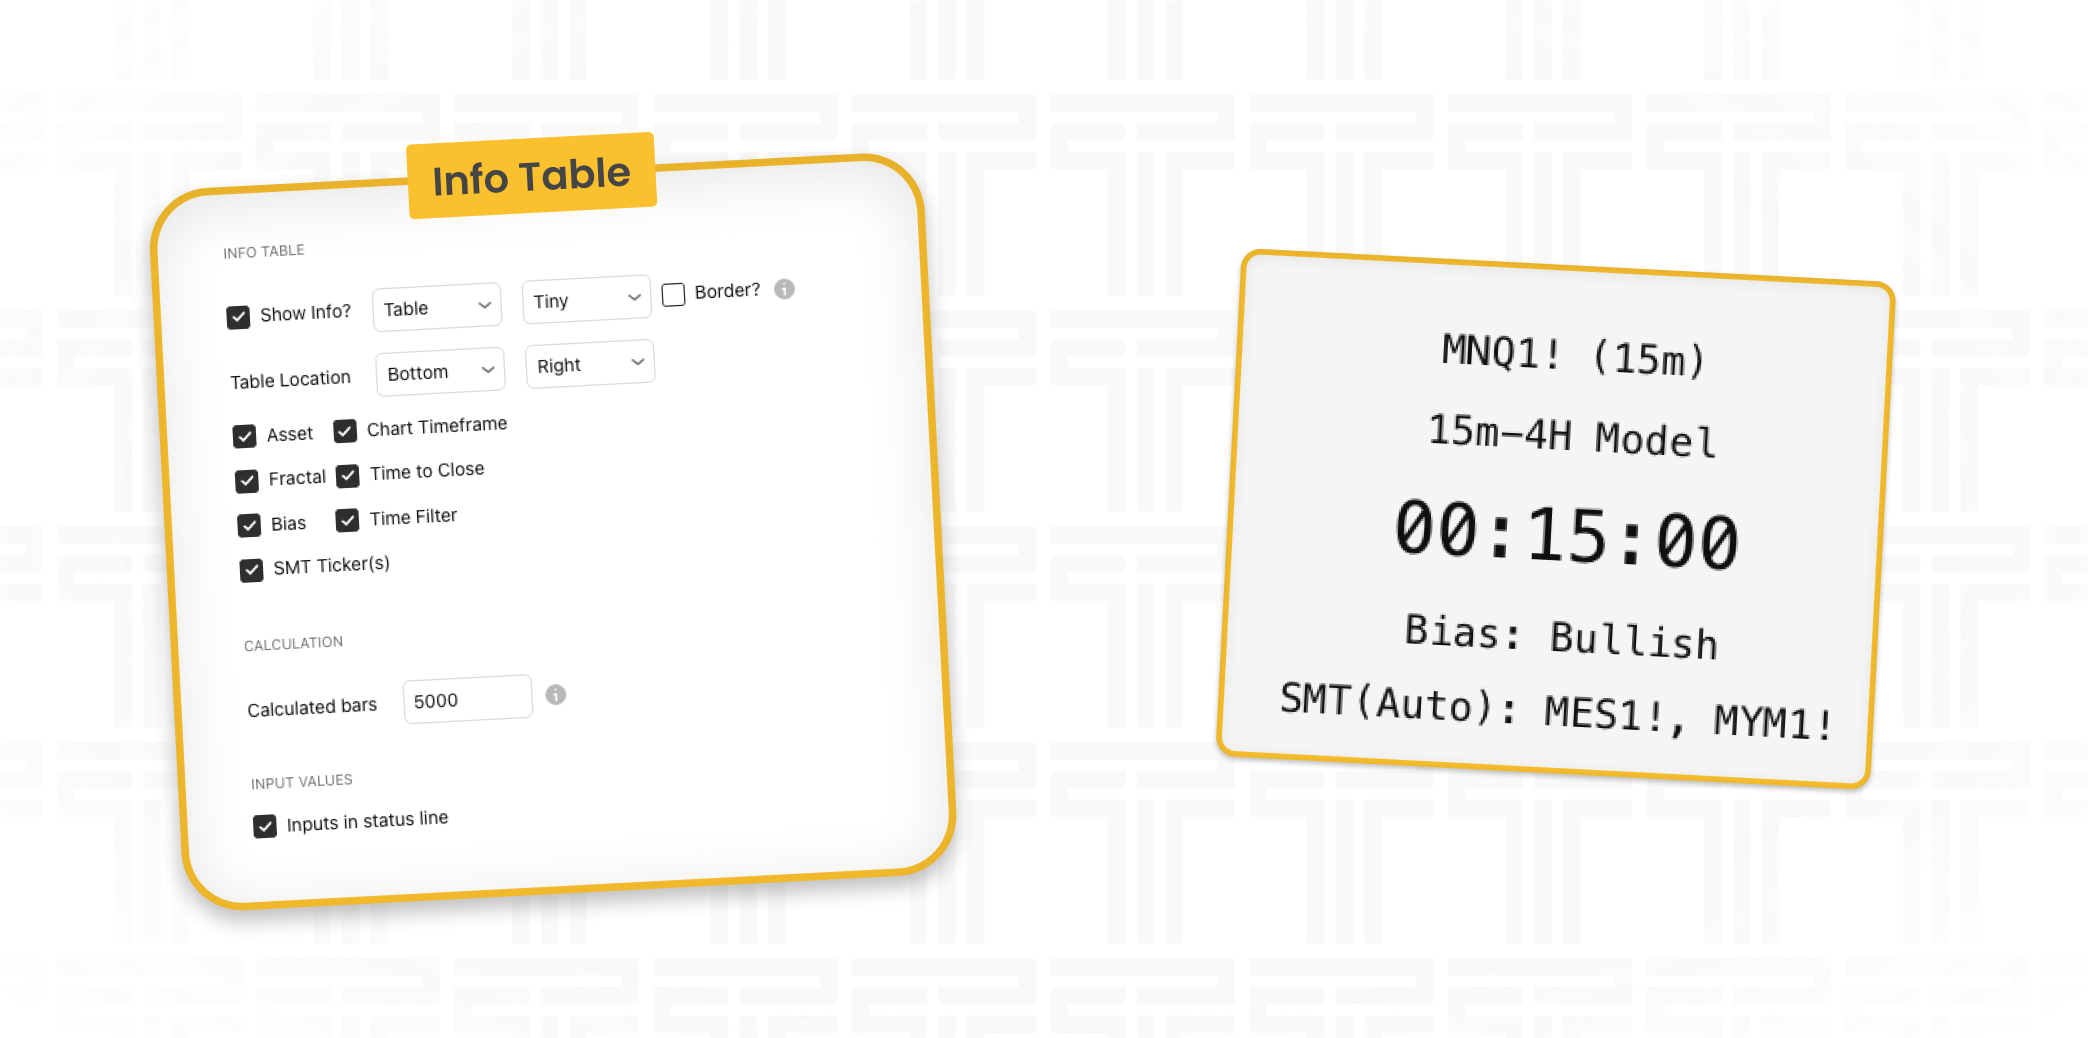
Show Info
The Show Info setting toggles the Info Table on or off, allowing you to enable or disable the display of TTFM model information on your chart. When enabled, you can also adjust the table’s size.
Table Location
The Table Location setting allows you to position the Info Table anywhere on your chart, giving you control over where the TTFM info is displayed. This helps you keep the layout clean and ensures the table does not obstruct price action or other key elements on the chart.
Selections
The Selections area allows you to choose what info is displayed. You can customize the table to show or hide elements such as the asset, chart time frame, fractal alignment, time until candle close, bias, time filter status, and SMT. This gives you full control over the information displayed based on your trading preferences.
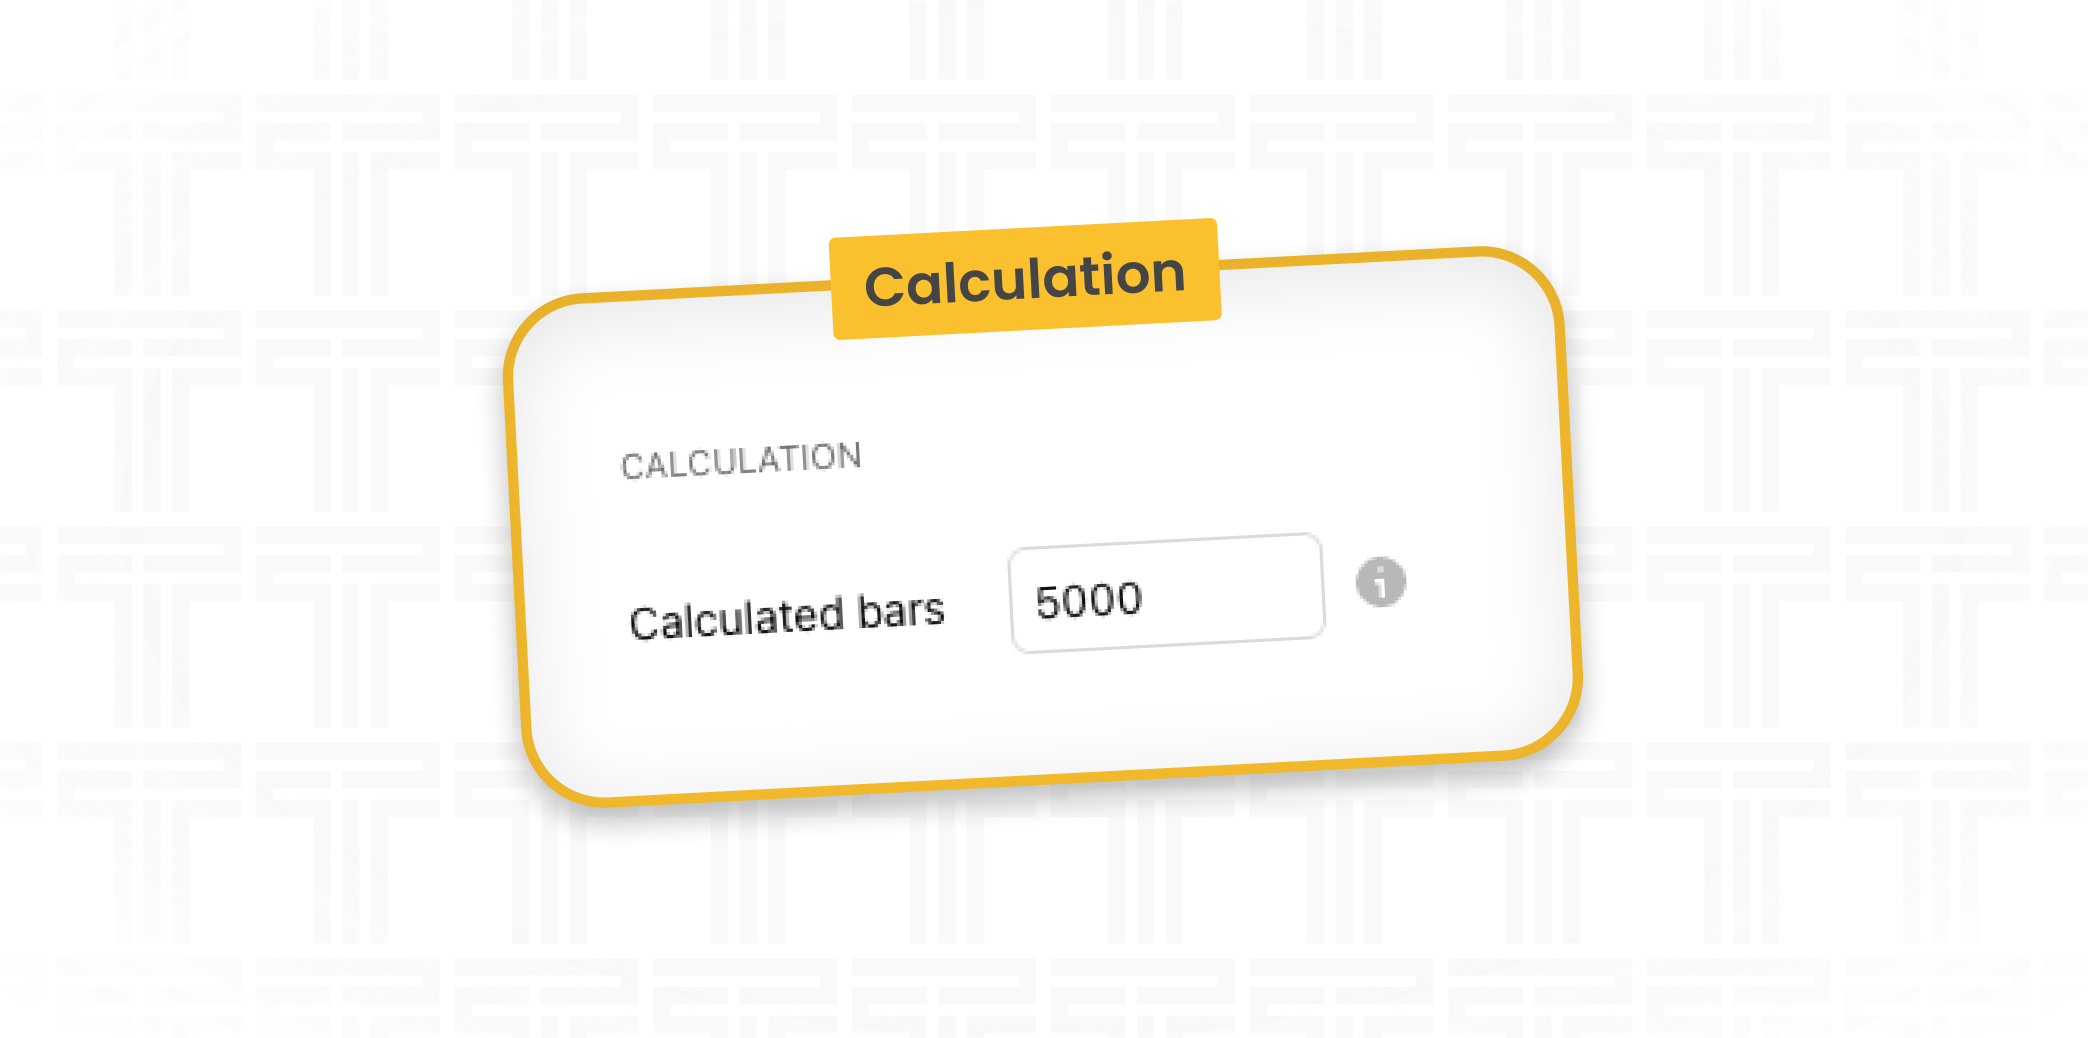
Calculation
Calculated Bars
The Calculated Bars setting limits the number of historical bars the script will process and display, based on the value specified. This can help improve loading performance by reducing the amount of data the indicator needs to calculate. If set to zero, the script will run on all available bars and display the full historical dataset.
TTFM Indicator Tips
Indicator Templates
Templates are super useful in having multiple different indicator settings that you can change and sort through quickly.
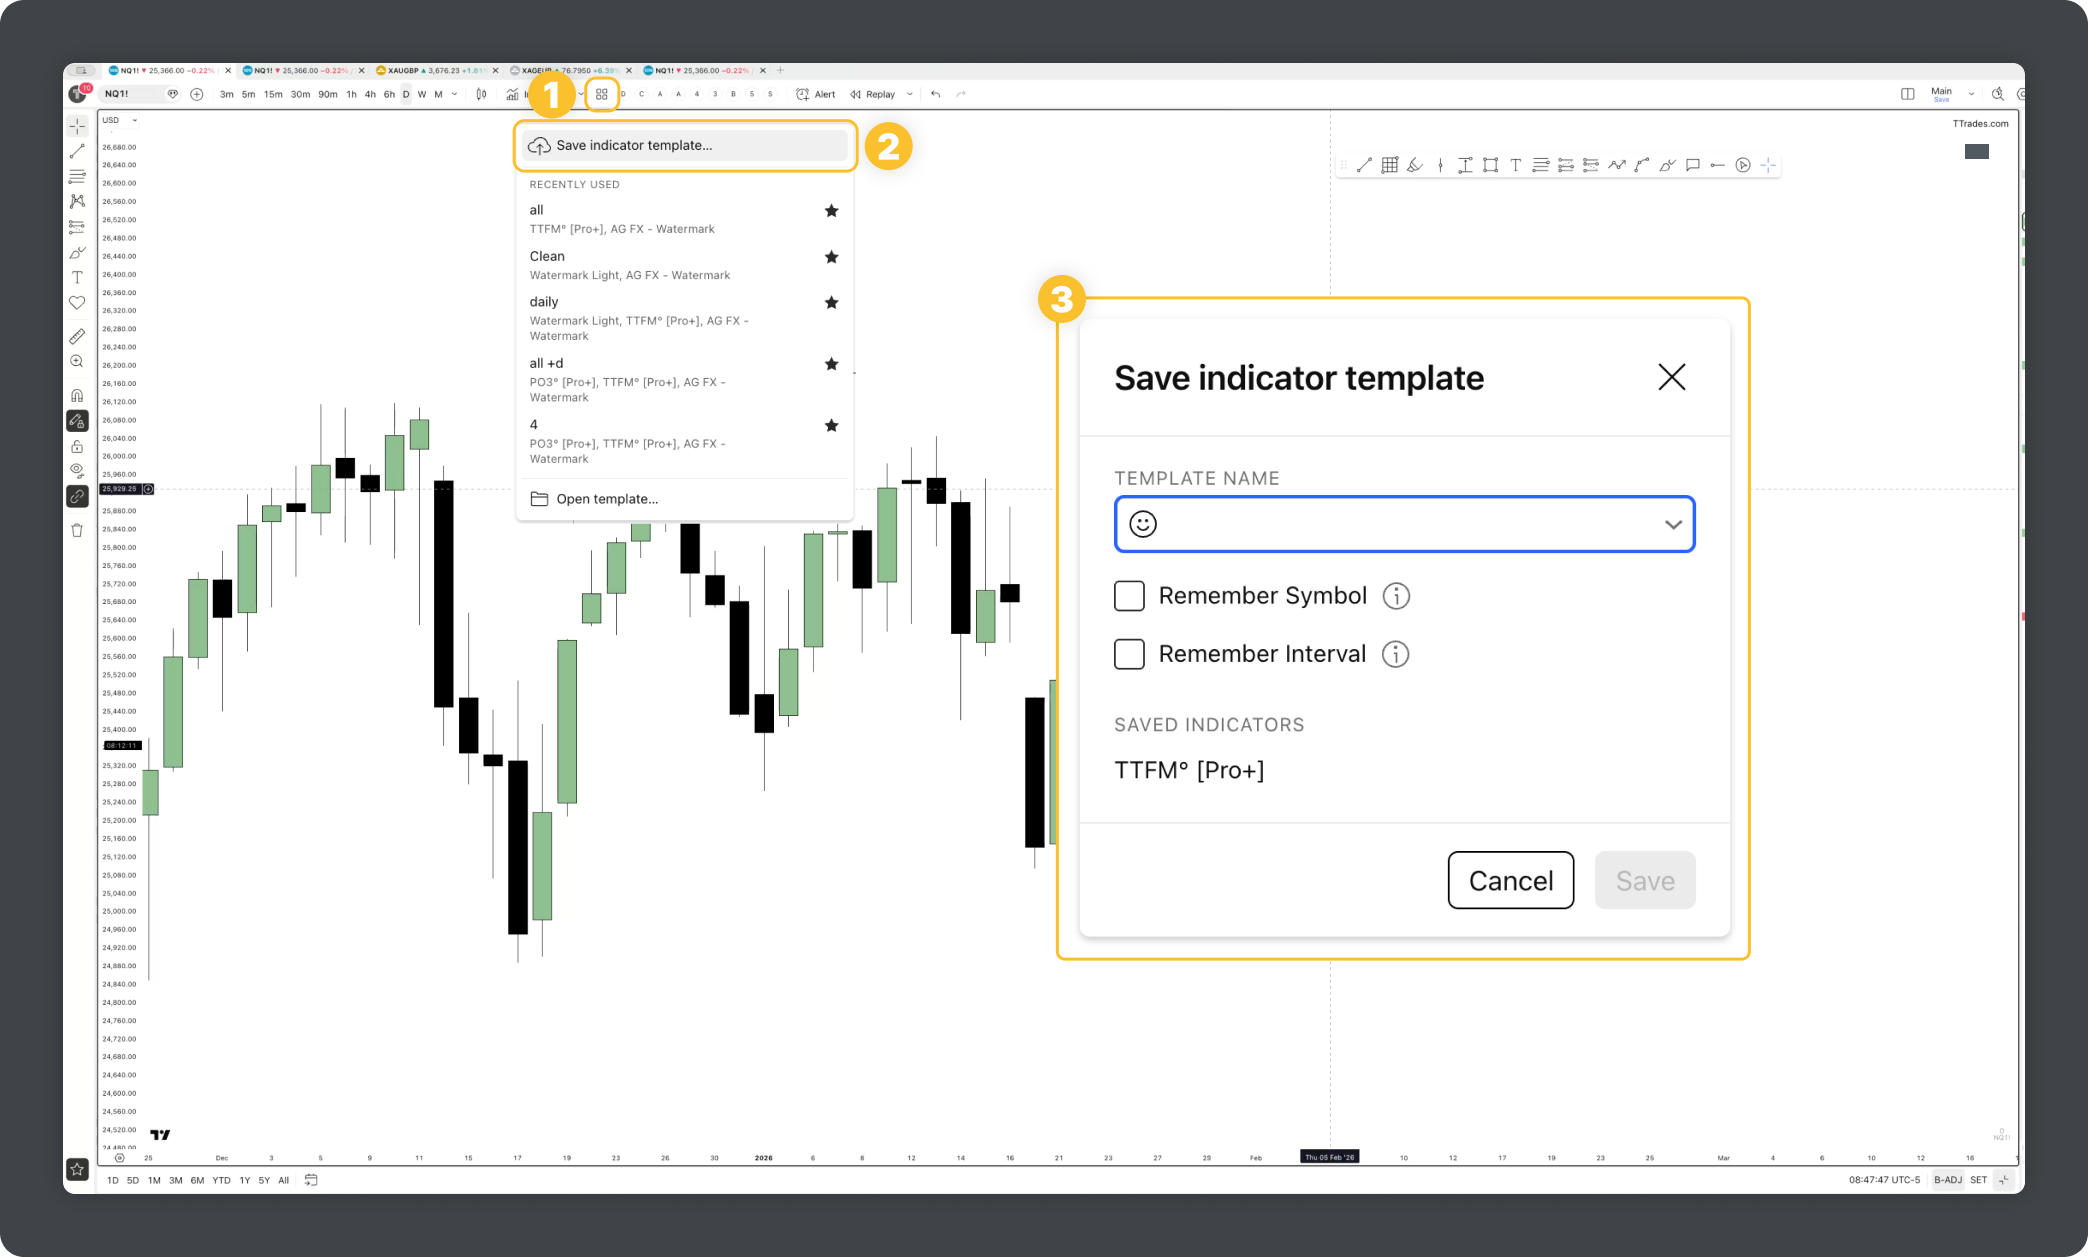
Creating Templates
To create a template, adjust the TTrades Indicator settings however you please. With your settings adjusted, click the four squares next to the indicators tab on TradingView. Save your Indicator Template and name it something you will remember.
If you want this template to always go to the current symbol, you can toggle “Remember Symbol”.
If you always want this template to go to the current timeframe, you can select “Remember Interval”.
Favorite Templates
Start your favorite templates and they will show across the main screen of your TradingView for easy access. This is how to quickly switch between different settings on the indicator using the favorites bar.

Overlaying Indicators
Many people want to see two or more TTrades Indicators’ on the chart To do this, you must overlay indicators together.
Adding Multiple Indicators
To add another TTrades Indicator, just go to the indicator section under invite-only and click on Fractal Model [Pro+] TTrades to add another indicator.
If you already have the indicator on the chart and are on desktop, you can also right click, copy, and paste the indicator.
Now that you have added another indicator, offset by 17 or more so they are not overlapping, adjust the fractal timeframe so you get the desired timeframes on the chart together. Save this as a template so you don’t have to make it again!
Using The Indicator To Learn The Fractal Model
The Fractal Model [Pro+] TTrades Indicator can be an amazing tool to help learn TTrades Fractal Model.
Learn the full Fractal Model with TTrades Mentorship in The Market Lens.
Lets go over how to make the best use of the indicator when you are first learning!
Create The Templates
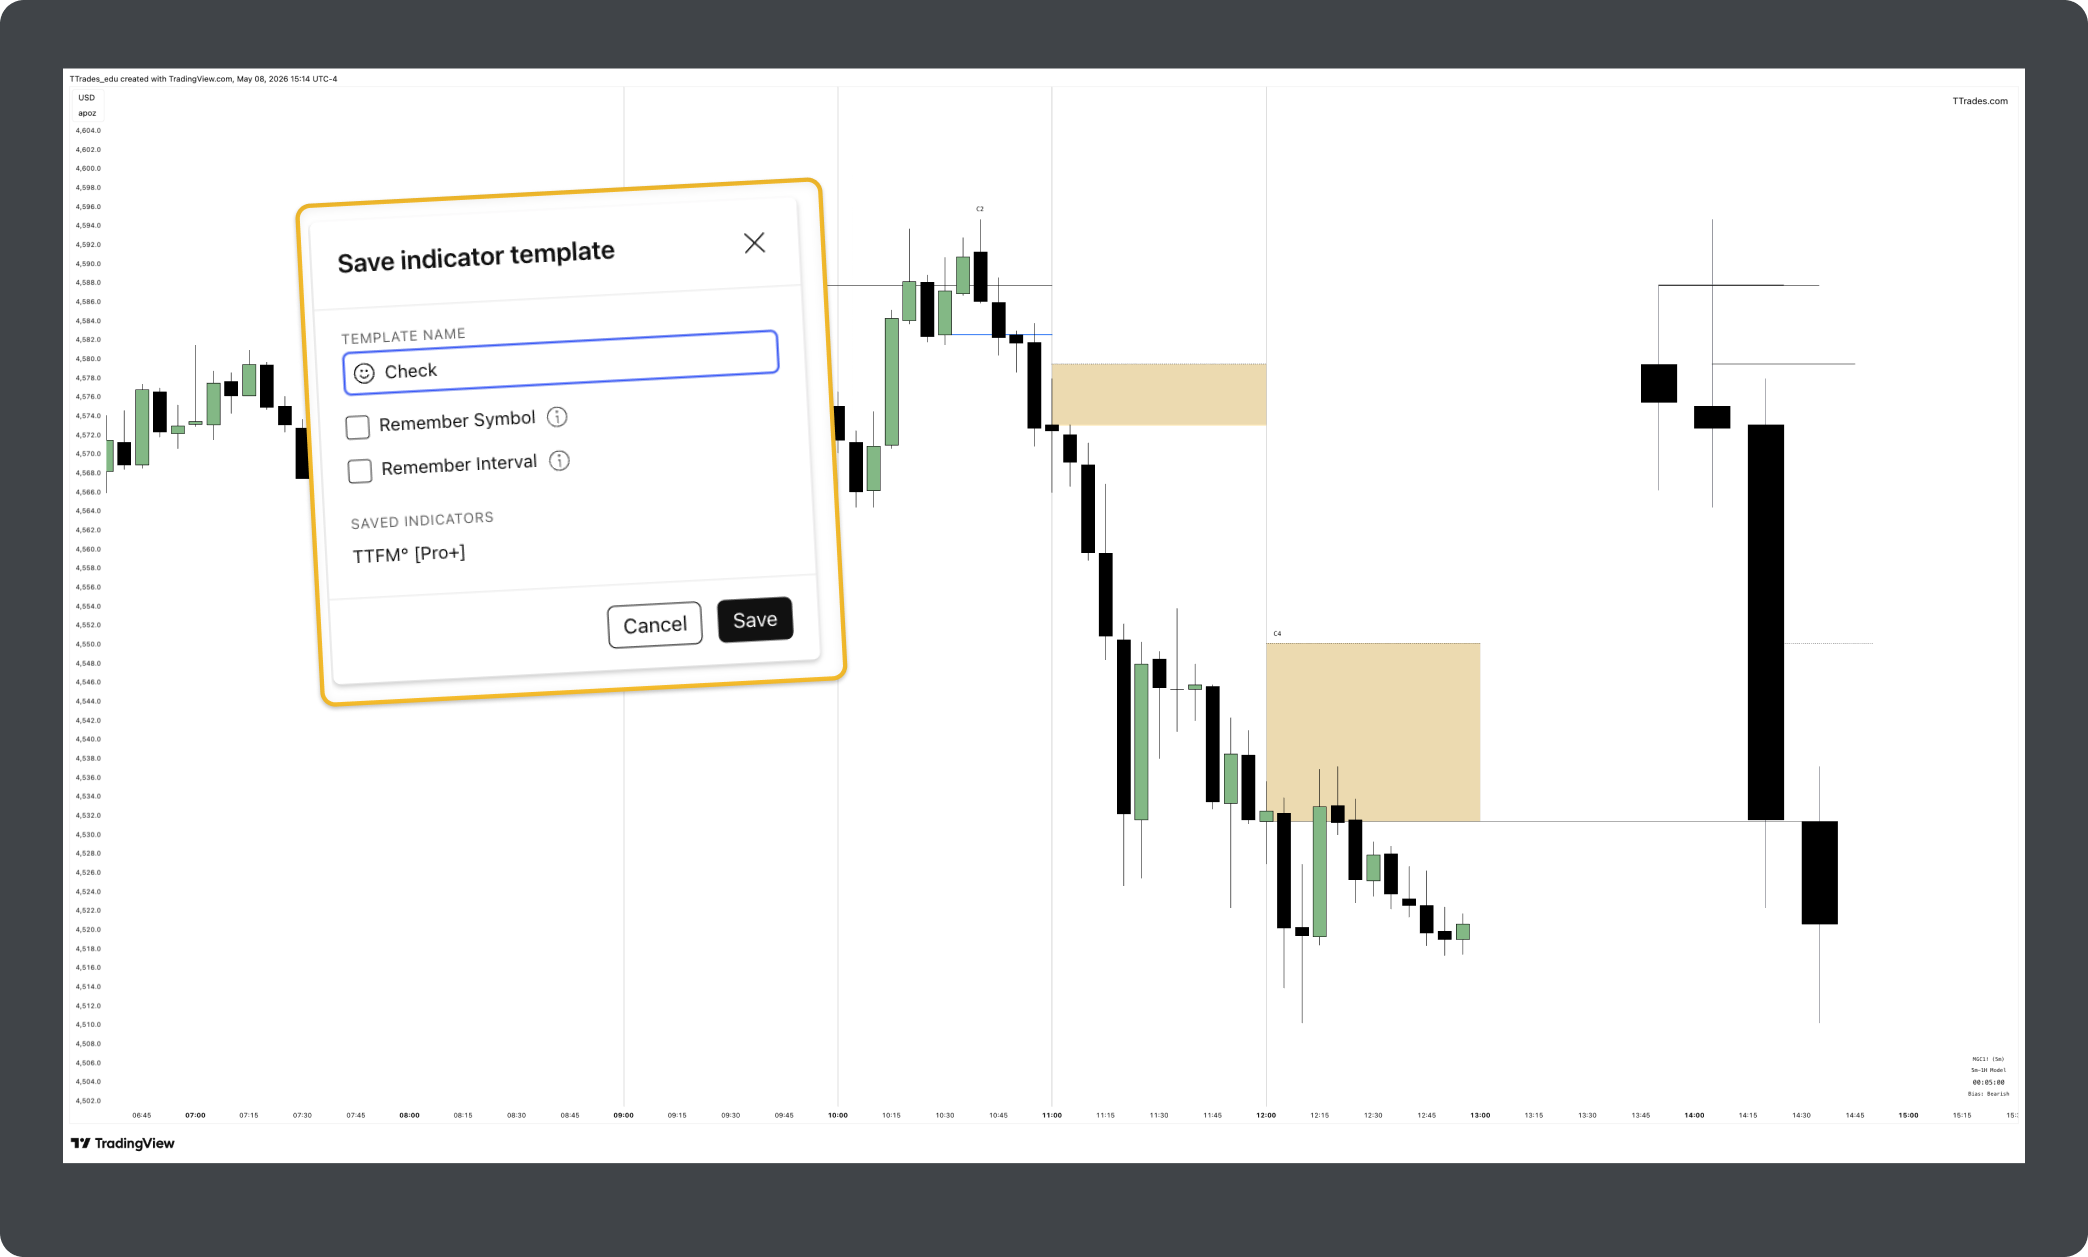
Create two templates using the steps above in the template section.
First create a template that has all the default settings on it, call it “Check”.
Next create a template that has C2, C3, C4 turned off in the Fractal section, call it “Quiz”
Make sure you have favorited both of these templates so they appear on the main screen.
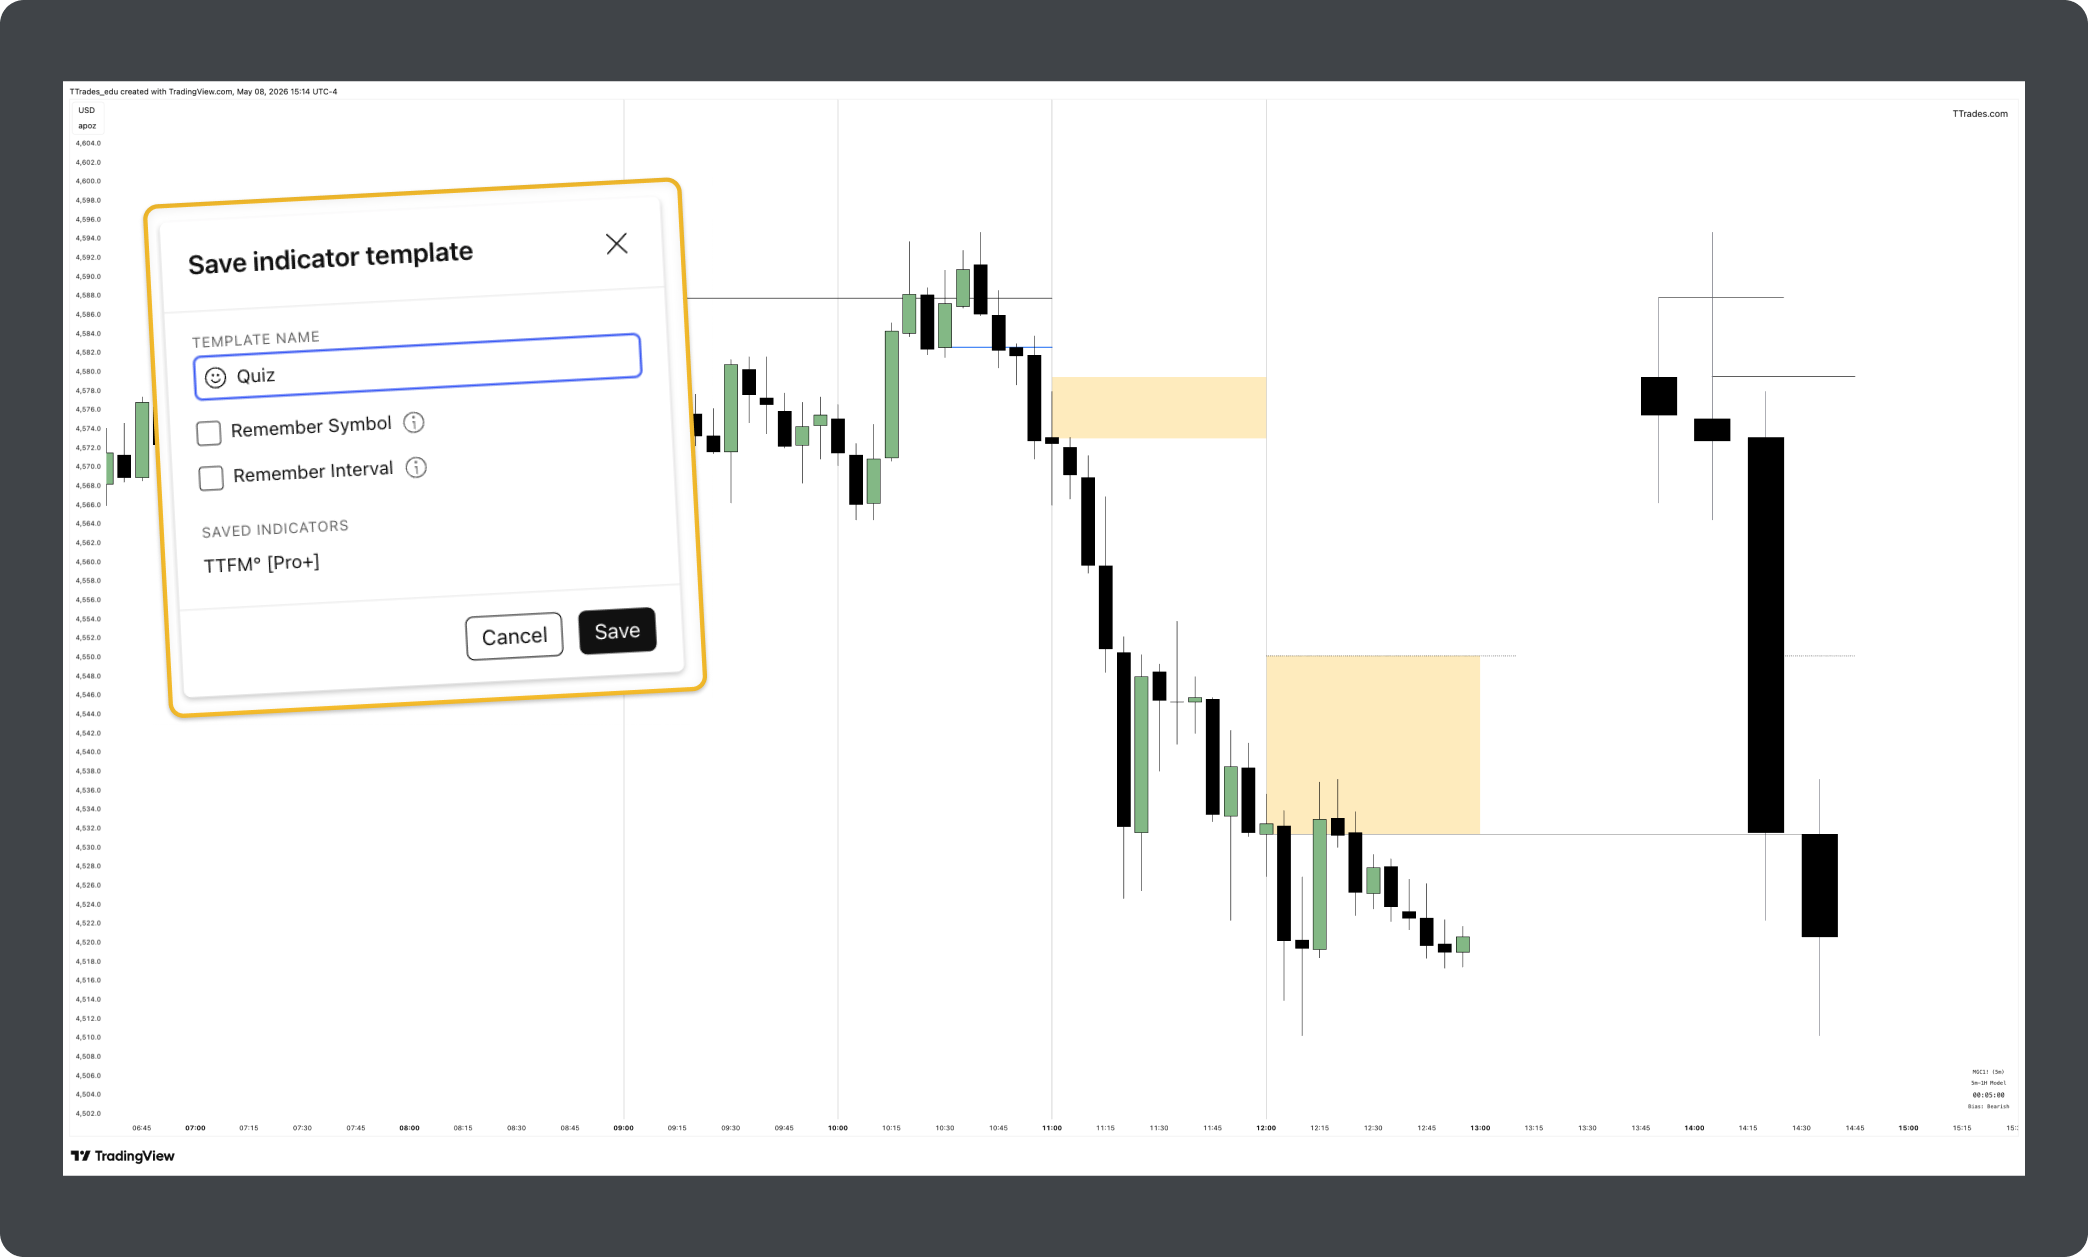
Quiz Yourself
With the “Quiz” template selected, go find a valid fractal model, practice charting and marking up the model. When you have finished with your charting, select the “Check” template and see if you have marked up the model correctly.
This is a very hands on approach to learning the model which helps with the learning process.
Future Updates
As the indicator evolves and new features get added, this guide will be updated to match. When something changes, this is where you’ll find the answer first, before you need to ask.